Wireless Connections
|
1238888 |
The
|
① WLAN On/Off Button ② Bluetooth On/Off Button |
|
|
FARO Wireless - Bluetooth
The
The Bluetooth connection will not support Laser Line Probe use.
Bluetooth wireless is a short-range communications technology intended to replace the cables connecting devices. The range of a Class 2 system, such as the
-
The
-
The host computer is the master.
-
Basic PIN based security is employed.
-
The host computer establishes an RS-232 emulation or Serial Port Profile (SPP) connection to the
-
Once the connection is established, the PC and
If your
To activate the Bluetooth signal, press the Bluetooth On/Off Button. Connect the
Using Bluetooth - Windows 10
Create the wireless connection between the host computer and the
-
The Devices category of the Windows Settings command.
-
FaroArm Manager
Ensure your computers Bluetooth radio is on. Some computers have a hard switch for the wireless receiver and some are only controlled through a software switch.
ScanArm to the Computer Connection
To connect your
-
Click Start > Settings.

Windows Task Bar menu
You can also click the Bluetooth icon in the task bar menu and choose Add a Device.
-
Choose Bluetooth and then your

Choosing your
-
Click Pair.
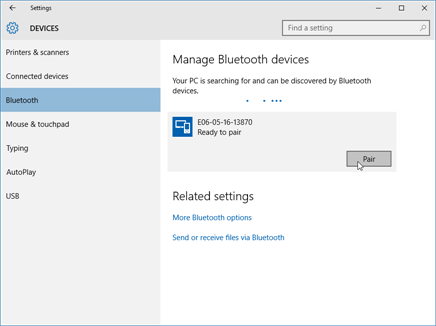
Pairing the
-
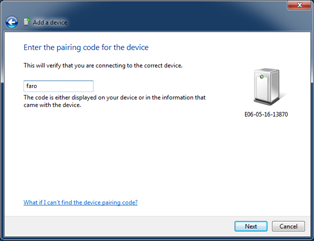
Enter the
faro, and click Next to create the SPP connection.
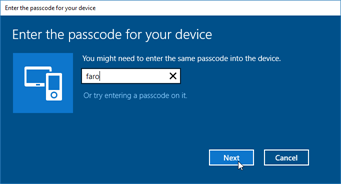
Entering the Pairing Code
The FaroArm Driver connects to the SPP connection using the FaroArm Manager
Using Bluetooth - Windows 7
Create the wireless connection between the host computer and the
-
The Devices and Printers category of the Windows Control Panel.
Ensure your computers Bluetooth radio is on. Some computers have a hard switch for the wireless receiver and some are only controlled through a software switch.
ScanArm to the Computer Connection
To connect your
-
Click Start > Devices and Printers.
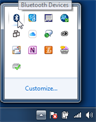
Windows Task Bar menu
You can also click the Bluetooth icon in the task bar menu and choose Add a Device.
-
Choose Add a Device from the menu in the upper left corner of the window. All

Choose your
-
Choose the Enter the device’s pairing code option and click Next.
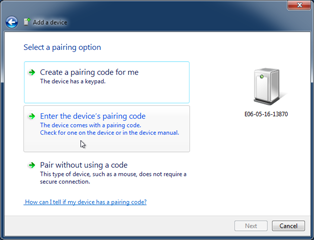
Device Pairing Code
-
Enter the
faro, and click Next to create the SPP connection.
Enter Device Pairing Code
-
Windows checks and installs the hardware drivers. When this is complete, click the Devices and Printers link.

Hardware Install Complete
-
Right-click on your
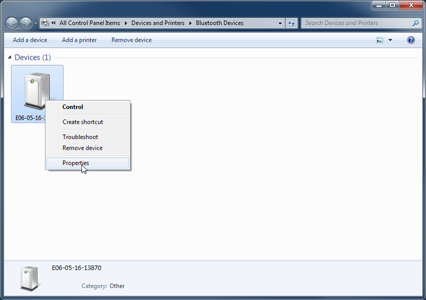
-
Click the Hardware tab, and look to see what COM port is assigned to your
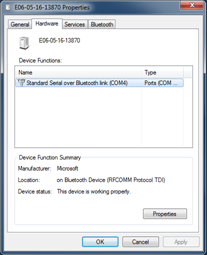
Write down your SPP connection COM port:___________________
This number is important and you will use it later.
-
Click OK to close the Properties dialog box.
The FaroArm Driver connects to the SPP connection using the FaroArm Manager.
FaroArm Manager
The FaroArm Driver connects to the SPP connection using the utility software. To connect your
-
Click Start > > FaroArm Manager.
-
Choose Bluetooth.
Choose the Bluetooth Connection
-
In the Devices list, click your
Choosing the Active Device
No more than two (2)
When the measuring software is launched (CAM2 2024, CAM2 SmartInspect, CAM2 Measure, Geomagic, Polyworks, etc.) the FaroArm Driver attempts to use any
Once you start measuring using a hard probe, there is no difference in data transfer between using the Bluetooth connection or the USB cable. The Bluetooth connection will not support Laser Line Probe use.
Deleting The Bluetooth Connection
To delete the Bluetooth connection, highlight the Bluetooth connection and click the trash can icon.
FARO Wireless - WLAN
The
A WLAN is a series of interconnected computers that communicate with each other over the air waves rather than through a network cable connected to each computer. In a WLAN, a radio communications device called an access point, or wireless router, connects network computers and provides network access. The access point, or wireless router, and the wireless network card in the computer communicate by broadcasting data from their antennas over the air waves.
The
After connecting the
For a detailed description of the
