Processing Settings for Third-party Scanners
|
1238888 |
On this page, you can define processing settings for non-FARO scanners. Note that the filters are only applied to structured scans.
-
Click the Settings icon
 on the right side of the workflow bar.
 -
Then click Processing and go to the Generic Scans tab.
To identify an inaccurate scan point, the filters compare the scan point with the scan points in the surrounding area. Some of the filtering is performed based on information from the point.
In the figure above the surrounding area oriented toward the recording point is shown. With filters, you can set what should be regarded as the surrounding area. In this example, the value 5 was set, which means the edge length of the surrounding square is 5.
Dark Scan Point Filter
This filter removes points based on a reflectance value. Reflectance Threshold indicates the minimum reflectance value a scan point must have. The Reflectance Threshold range is: 0 to 2048.
This criterion is useful because with a dark scan point, only a very small amount of light entered the scanner and therefore the measurement will have an increase in noise.
Distance Filter
This filter removes all scan points which are outside of the defined distance range. All points with a distance less than the Minimum Distance and all points with a distance larger than the Maximum Distance will be deleted.
Stray Point Filter
This filter removes outliers or stray point. It checks if the 2D grid cell of a scan point contains a sufficient percentage of points with a distance similar to the scan point itself.
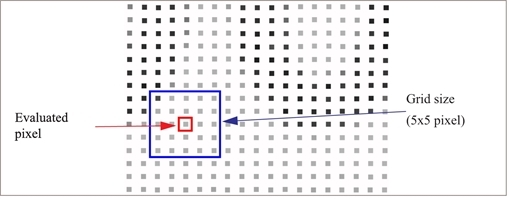
Figure 5-8 The area surrounding a scan point, in a 2D grid
-
Grid Size: The size of the surrounding area used for comparison.
-
Distance Threshold: A scan point is counted if the difference in distance is smaller than the value of the distance threshold. The algorithm uses the distances between the scanner and the points.
-
Allocation Threshold: If at least the percentage of scan points indicated by the allocation threshold is below the distance threshold. To intensify the filter:
-
Increase the grid size
-
Decrease the distance threshold
-
Increase the allocation threshold
This filter works well for most scenarios. The default settings are good compromise but you should be careful when intensifying the filter. It could become too aggressive.
Take special care:
-
If you want to preserve points over the small isolated objects like wires and cables.
-
If you have scans with low-resolution objects that are far away from the scanner.
-
If the ground is mainly grass and you want to preserve it.
-
In surfaces where the angle between the surface and the laser beam is small.
Edge Artifact Filter
This filter eliminates edge noise from scans. Edge noise is caused by the thickness of the laser line. The laser might catch a point on the edge of a table and on the floor which causes the point to be returned in the middle, see figure below. This filter is very useful on curved objects, such as piping. It is highly recommended to always use this filter.
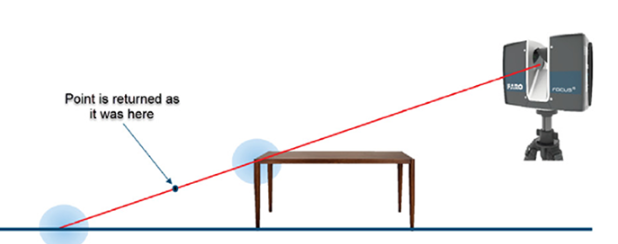
Figure 5-9 Edge artifact filter
The Find Targets section allows you to select targets such as checkerboards, planes, and spheres. These will then be searched in each scan during processing.
Finding targets is time-consuming and should be enabled only when scans are registered with the target-based registration.
Find Checkerboards
A frequently used paper target is the checkerboard target. A checkerboard target fit determines the center point of the target’s four quadrants. Select this option to find checkerboards and use them for scan registration. note that the angle between the laser beam and the checkerboard should be higher than 45 degrees. Otherwise, the accuracy of checkerboard may be compromised.
Find Markers
Select this option to find markers. Markers are printed targets with a unique ID.
Find Planes
Select this option to find planes and use them for scan registration.
Find Spheres
This refers to three-dimensional, white, reference spheres that come in various sizes. The advantage of spheres is that they can be placed at any angle to the scanner. Select this option to find spheres and use them for scan registration.
Sphere search works with spheres meant for registration. Forensic spheres (used for determining shot trajectories) may not be found by this target search.
The global list of sphere sizes set in the Settings > Processing page are displayed in the active and inactive sphere radii list.
Active Sphere Radii
Click Add New and specify new sphere radii. These sphere sizes will be used for target detection.
This list of user-defined sphere sizes will be used for processing the scans in the current processing task run.
Inactive Sphere Radii
Click Add New and specify additional sphere radii for sphere detection.
Drag the sphere radii that are not required for the current project, from the Active Sphere Radii to the inactive Sphere Radii list.
You can easily move items between the two lists and manage the sphere radii for processing the scans in the current project.

