FotoPoints Guidelines and Tips
 Mobile Phone Videos
Follow these guidelines to capture video that will generate the best point cloud from FotoPoints.
-
Hold the phone in landscape position.
-
Place a scalebar in the background, if possible.

-
Capture the video as if you are painting a dome around the object. Start by holding the camera above the object, and then move lower as you circle the object. Walk slowly.

-
Keep the camera between 3 - 12 feet (1 - 4 meters) away from the object. Best results are typically 3 - 4 feet. Moving the camera closer does not result in more detail in the point cloud.
-
If your phone allows you to configure video settings, set the capture mode to HD 60fps at 4K.
-
Do not use zoom. The zoom value must remain at 1.0.
-
Avoid taking video in direct sunlight. If you need to scan outdoors, wait for an overcast day, and plan to scan during the morning or late afternoon when the sun is lower in the sky.
-
Avoid taking video of objects in lighting that causes reflections on the surface of the target object.
-
Capture the same objects from multiple angles (parallax). Move around the object. Standing in one spot and panning/rotating the phone will result in an incomplete point cloud.
-
If you are capturing video indoors, watch out for glare from windows. Also, try to avoid capturing video in rooms that have highly-textured walls.
-
Walk slowly, and avoid rapid, jerky movements. A gimbal is recommended. Avoid large left to right rotations with camera.
-
For small spaces, try using a wide angle lens on your phone.
The ultra-wide-angle lens has a different focal length than the main wide-angle lens, you need to add a new custom device for this lens. Remember, you'll also need to take a reference photo using the wide angle lens.
After you begin capturing video with the ultra-wide-angle lens, make sure the zoom level does not change. iPhone users, do the following: hold your finger on the screen on the object on which you want the camera to focus. This activates AE (Auto-Exposure) and AF (Auto-Focus) lock for the camera. You will see a yellow rectangle blinking, and then once the focus is fixed, you see the message “AE/AF Lock”.
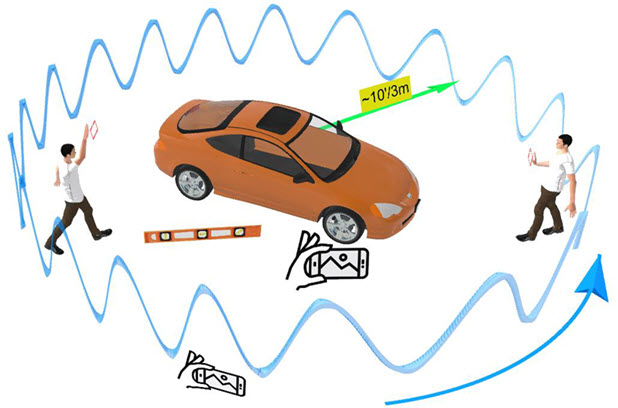
Filming vehicles
-
Avoid filming vehicles in direct sunlight.
-
Use a scalebar.
-
Walk around the vehicle slowly, filming high to low.
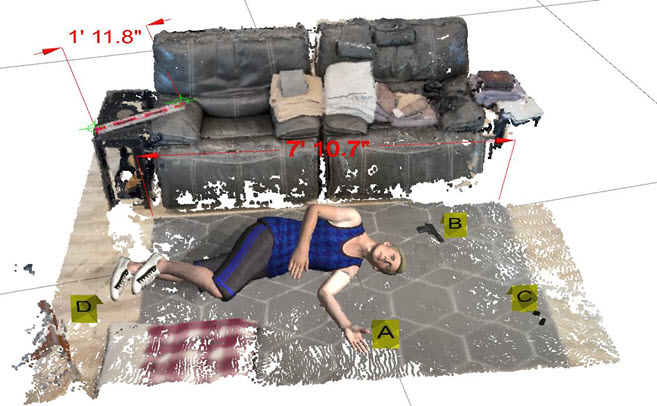
Capturing video in rooms
Due to lighting, room layout, wall texture, etc., you may need to try different methods to video the room.
-
Use a scalebar, if possible.
-
Walk slowly around vehicle filming high and low.
-
Hold the phone high, with the camera pointing downward.
-
Hold the phone low, pointing the camera towards objects.
If you are capturing video in a room with windows, close the blinds to reduce glare, inconsistent lighting, etc.
If you are capturing video against a wall, circle the subject while filming.

Capturing video of the front of a building
-
Capture video from one side of the house ~30’ away with camera at ~45°.
-
Repeat in the opposite direction.
-
Capture the video at varying elevations.


Cameras
You can capture suitable photos from the following types of cameras:
 DSLR
DSLR
Most newer DSLR cameras (with normal/high quality lenses) can deliver images sufficient for photogrammetry. Following are best practices for using DSLR cameras to capture images for FotoPoints.
Take lots of pictures
Capture images of the same feature from multiple angles, and different heights (high, middle, low). The more photos, the better.

Photos must be clear
Maximize the depth of field. The entire image should be as sharp as possible. Shallow depth of field photos with soft effects are pleasing to the eye, but they prohibit photogrammetry software from identifying features. Use higher f-stop settings when possible.

Use proper lighting
Even, flat lighting works best. Try to take photos in overcast conditions, in the early morning, or late afternoon. Avoid harsh, direct sunlight and don't use flash. Photogrammetry cannot effectively process photos with excessive shadows or glares.
Other tips:
-
Use consistent camera settings (f-stop, focal length, etc.) for all of the photos in a set.
-
Don’t use digital or optical zoom.
-
Only use auto-focus for the first image. Use the same focus distance for all of the images in a set.
-
Use a wide-angle lens (20mm to 24mm or wider). Photos should overlap, which is easier to accomplish with a wide-angle lens.
-
Increase or decrease your camera's exposure setting to compensate for under/over exposure. Lower the setting when the photo is overexposed, increase the exposure when the image is underexposed.
 Drone
Drone
As with other cameras, best results are achieved with lots of photos captured from multiple angles.
Other important factors include:
Height - The drone needs to capture the photos at an altitude suitable for catching all of the details of the subject, while not flying so high that the photos are unclear, or include erroneous data.
Speed - It's important to capture the images with the drone at a consistent speed.
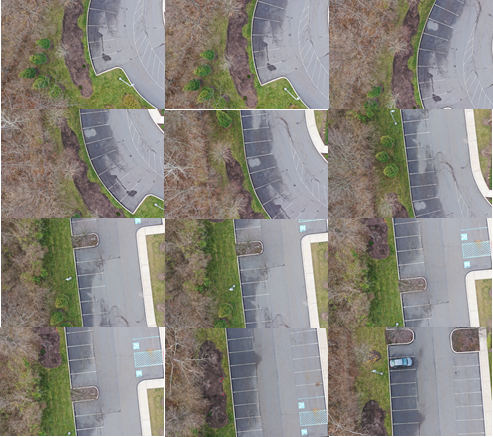
Overlapping images - Lots of images that overlap may seem redundant, but they are required to combine the data to make a complete, detailed point cloud. Most quality point clouds require an image overlap of at least 70%. Depending on your subject, more overlap may be required.
Angles - Photos captured from multiple angles are required to provide the detail required for viewing the point cloud from every angle.
Clear photos - The drone must remain steady during flight to capture the clearest photos. Try to avoid capturing photos in windy conditions. Depending on your drone, there may be other factors (settings, etc.) that you can use to help keep your drone steady.
If it's possible, you may want to try a few test runs to ensure that your speed, altitude, and lighting allow the drone to capture quality images.
About Nadir Images
You must be careful using drone images in which the lens is facing perpendicular to the ground (Nadir images).

These images distort the details of the point cloud and result in a curvature effect when you view the point cloud from other angles.

For best results, use a combination of Nadir (vertical) and oblique images.

 Mobile phone
You can use other cameras like mobile cameras and point and shoot cameras, but they are not ideal for photogrammetry. Mobile phone cameras have smaller sensors and lower quality lenses (made of plastic and not glass). Most phones use software post-processing to improve photos. A photo that looks high-quality after application of filters and effects may still lack the elements required for photogrammetry operations.
Although mobile phone cameras are not recommended for photogrammetry, you can create 3D measurements and generate point clouds with them. If you have no alternative, use the photo guidelines listed for other camera types. With some practice, it is possible to create point clouds using photos from your phone.
Here are some tips for capturing point clouds with mobile phones:
-
Use an app that allows you fix ISO, exposure, and other settings for all of the images. Don't use the default camera apps, because their automatic settings change exposure between images, and you cannot set focus separately from exposure.
-
Capture images in an uncompressed format (e.g., TIF) whenever possible.
-
Use a non-fisheye, wide-angle lens.
-
As with other camera types, take abundant overlapping images from all angles. Take images of the subject in a dome pattern.
-
Lighting is especially important with phone cameras. Try not to shoot in direct sunlight, or with lighting that causes glares and shadows. Capture photos in flat, neutral lighting.
-
If you are trying to capture a light-colored object with few surface features (such as an interior wall), consider using a DSLR. DSLR cameras are better at capturing images in low light conditions.
-
Make sure that the phone is very still while you are capturing photos. A tripod or other stationary phone holder is recommended.
-
Lighting needs to be consistent throughout the photo capturing process. If you are shooting outside, be wary of sunny days where there are lots of clouds, and avoid shooting images at dawn or dusk. An overcast day is best for shooting images with consistent lighting.
Photo Environment
Consider the following when taking photos that will be converted to point clouds.
Background - Keep the background simple with minimal obstructions, and no reflections or shading. Top-down photos are better. The background should provide contrast to the subject of the photo.

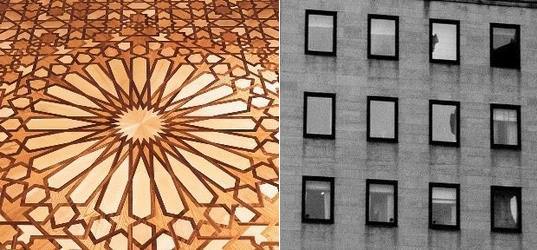
Surface texture - Some objects’ surfaces, colors, and shapes photograph easily, while others present distinct challenges. If the surface of the object has lots of points, curves, etc., take more photos to capture the detail. Photos that include surfaces with large, flat uniform areas are more difficult to convert. Photos that contain objects with repetitive patterns like the following can be difficult to convert.
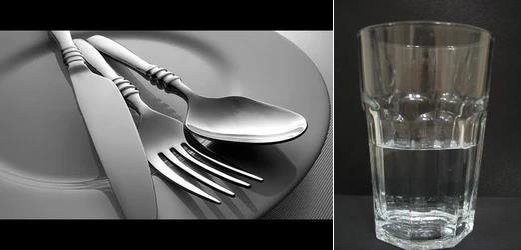
Reflectivity - Objects that are shiny, polished, or reflective are more difficult to convert because they reflect light in the photo. Similar issues occur with transparent or translucent materials, as light passes through the material and limits capturing the object's surface. These types of objects include mirror surfaces, glass, transparent surfaces, and shiny or metallic surfaces.
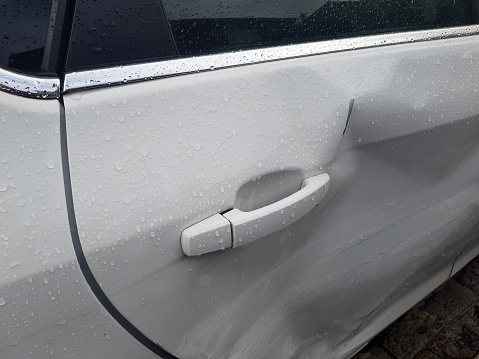
Color - You can photograph objects with surfaces of all colors, but light colors are typically easier to photograph. Use proper lighting and contrasting backgrounds for objects with black or very dark surfaces. The following photo would not convert well due to lighting and color.
