Predicting Collisions With MassZone Using Vehicle Position-based Animation
-
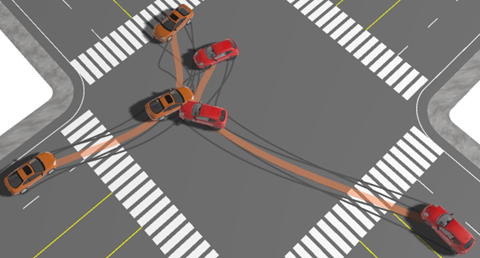
Use the animation tool to set up an animation that includes a collision between two or more vehicles. Place the vehicles at various positions along the travel path derived from scene evidence or calculations. You will animate the start of the vehicle's travel path, the point of contact, and the post-crash resting position. MassZone takes over from the point of the collision to the moment the vehicles are no long in contact.
-
After you place the vehicles in their proper starting positions, you will need to set the animation paths from the starting point to the ending (rest) point following the collision. Select the first model, hold down the shift or Ctrl key and select the models in order.

-
With the model selected, from the Animation ribbon, click Animate from Stationary Points
 .
.
This creates the animation path. -
Repeat the previous 2 steps for the second vehicle.
-
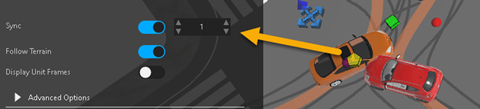
Click on the vehicle located at the point of collision on the first animation path, and from the tool panel, enable Sync. Leave the value set to 1.
-
Click the other vehicle model on the second animation path at the collision KEP (Key Event Point) and enable Sync. Leave the value set to 1. This ensures that the two models meet at this key point at the same time.
-
Run the animation and make required adjustments.
-
Select the first animation path and from the tool panel, click Add to MassZone. You can also right-click the animation path and select Add to MassZone from the context menu. This adds the model to the MZU.
-
Repeat for the second animation path.
-
Open the MassZone Control Panel by right-clicking an animation path and selecting MassZone Control Panelfrom the context menu.
-
Run the prediction. The vehicles follow the animation path until the collision occurs, and then the MZU prediction calculations override the animation. In this case, the vehicles collide, damage and positions are calculated, and then the vehicles stop.

-
You can compare the MZU prediction to the animation. Use the MassZone Control Panel to run the prediction. Use the animation controls to run the animation.

-
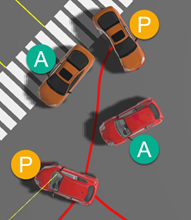
You can see the ending rest positions of the vehicle in both the animation (A) and the prediction (P). You can adjust the MZU settings to improve the prediction. You can also adjust the animation to follow the prediction models more closely.
-
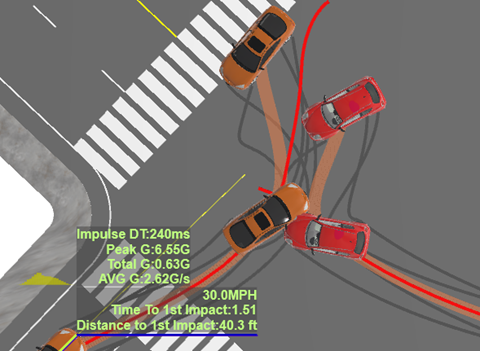
The prediction model can also display tire paths and skid marks which could be helpful if there are skid marks documented from the scene that you can use for comparison.
A position-based animation gives you more control of the vehicle paths and positions, up to the point of the collision, and immediately after the collision. This simplifies setting up the system for MZU collision prediction. You can compare your animation with the MZU prediction model, and fine tune the result by adjusting the animation, and also the controls in MassZone.
To use a position-based animation for MassZone prediction:
The animation path displays on top of the vehicle models you placed on the screen. Move your selected models to their own independent layer so you can hide them later.
Select a model that’s part of the MZU and from the properties panel click Copy Model End of Run. This copies the model at its predicted resting position and includes damage to the vehicle. The copied model is independent of the prediction system, so you can select it, move it, measure it, etc.
.
