 3D Warehouse
3D Warehouse is an open source service designed for uploading and downloading 3D symbols.
To insert a symbol from the 3D Warehouse.
-
From the Symbols ribbon, expand
 Symbol Load Options and select 3D Warehouse.
 -
Log in, if you haven't already done so.
-
Enter a search term to find a specific symbol, or scroll through the tiles.
-
Click a symbol. The symbol page opens.
-
Click Download to see a menu of available versions by date.
-
Select a version and click Save.
Do not click Open.
-
The symbol downloads to the folder you specify. You can download the file to the Windows Download folder.
-
Close the download prompt.
-
Click Place.
-
The symbol opens in the Image Editor. Modify the image, as appropriate.
Image Editor
A 3D Warehouse symbol opens directly into the Image Editor. You can also access it via the symbol's right-click context menu, and the Symbol Details tool panel.
When modifying 3D Warehouse symbols, follow the order of the commands on the toolbar.
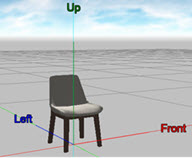
 Rotate - A coordinate system composed of a blue Left line, a red Front line, and a green Up line provides visual guides for orienting a symbol. From the tool panel, use the Yaw, Pitch and Roll values to rotate the symbol into alignment with the guidelines.
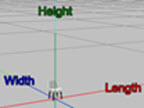
 Scale - Guidelines for scale are green for Height, red for Length, and blue for Width.
The Size tool panel contains controls to scale all dimensions uniformly. It also contains length, width, and height controls to change individual dimensions. Modify these dimensions to give the symbol real-world values.
FARO symbols are always to scale; 3D Warehouse symbols may not be. If you reference the length of a vehicle, enter it for automatic adjustment of width and height. If the dimensions seem inaccurate, check the units of measure.
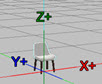
 Center - For animation, a center reference is critical. Guidelines for Center are red for X, blue for Y and green for X.
The Center toolbox contains controls for X, Y, Z, as well as a Center command. Click Center to automatically center the symbol. Use X, Y, and Z to refine the center point, if necessary.
 Parts - If a symbol is composed of parts, the Parts command will be active. Click the Parts command to open the Part tool panel. Select a part from the list, or click the part on the symbol to select it. Adjust color, transparency and reflectivity or hide the part from view. Use the switch to quick color the part to the main symbol color.
 Snapshot - To save a snapshot of the symbol, click the Snapshot command and save the snapshot to a desired folder.
 Save - After completing your changes, click Save (Documents\FARO Zone\Custom\Symbols is recommended), rename the symbol (if desired), and then close the Image Editor by clicking X.
 Place - Upon closing the Image Editor, the symbol displays at the cursor for two-click placement. The first click places the symbol, the second orients it. Manipulate the symbol with the grip system or in the Symbol tool panel.
