Scan Projects and Clusters
|
123-2024-10-21-888 |
The Projects/Clusters page displays the structure of your scan projects. A scan project usually consists of a main project that has several sub-projects called clusters. For example, if you are scanning a multi-level building as a project, each floor of this building might represent one cluster, and each of these floors or clusters can have further clusters, for rooms. Note that project and cluster names may not contain any special characters, or characters with umlauts or accents. All such characters will be replaced by underscores.
The structure of a scan project is similar to this:
-
Office building
-
Floor 1
-
Room 1
-
Room 2
-
Room 3
-
Floor 2
Room 1
Room 2
Before starting a scan project, you can manually enter this structure here.
Once the project structure has been created, assign the single scans to the corresponding clusters. To do this, select a scan project and cluster before starting a scan. This project should correspond to the current scanner position. For example, if you take scans in the office building on Floor 2, in Room 2, select room 2 from the project list, then start taking the scans in that room. The next scans are then assigned to the selected project or sub-project room 2 until you select another cluster. This information is attached to each scan. It helps SCENE or Sphere XG automatically assign scans to scan clusters, thus automating the scan registration. For more information on scan registration and assigning scans to scan clusters, see the SCENE user manual.
Every project and cluster receives a unique internal identification number upon creation. Assigning the scans to scan clusters during post-processing in SCENE is done according to this identification number, not on the basis of the project name. This is particularly relevant when working with several scanners on the same scan project. In this case, you must set the storage on all scanners to the SD card, then create the project structure once as a master, and transfer it to all of your scanners. Thus, we do not recommend creating or editing a project of the same scan project separately on each scanner. Even if the separately created projects and clusters have the same name, they receive different identification numbers and are treated as different projects by SCENE.

Figure 6-11 Projects List
This view shows a list of all created scan projects/clusters.
The Default_Project is a standard project used, when not working in a particular scan project. The Default_Project cannot be deleted, and the name of the project, as well as the parent project, cannot be changed.
Add a Scan Project or Cluster
![]() Manage > Projects/Clusters > Default Project
Manage > Projects/Clusters > Default Project
To add a project, tap + at the bottom of the projects list. A new sub-project called Default_Project.1 is added to the selected project. Tap the field to open its parameters. This opens the View Project/Cluster menu.
Change the name, and enter further details for the new project. To make the new project the main project without any parent projects, you must either change its parent project to No Parent Project, or select the Default_Project before adding the new project. With the Default_Project selected, new projects are added as the main project without parent projects.
Project Name
Tap to change the name. A name must start with a letter and may contain letters, digits, and underscores.
Parent Project
The parent project of the displayed item. No Parent Project means that the current item is a project and not a cluster. Tap to change the parent project or parent cluster. A new screen appears with a list of all available parent projects or parent clusters. Select the parent project/cluster from this list. The currently edited item is then be assigned as a cluster to this project/cluster.
Figure 6-12 Select Parent Project/Cluster
Shows all available projects and clusters eligible to be a parent project/cluster. Tap to select the parent project/cluster. The selected parent project/cluster is highlighted.
No Parent Project
Tap, if the project should not have a parent project.
Project Information
Customer
If you are carrying out the scan project for a customer, you can enter the customer's name here.
File Base Name
The scan is saved with a file name consisting of this base name, followed by the current scan number.
Initial Scan No.
This automatically increments with each successive scan. It can be reset and can be used to indicate the number of scans per scan session. (If a scan with identical scan number and name already exists, the scan number will be automatically incremented to the next unused number.
Additional Info
Additional project information.
Enter the approximate (+/- 10° is sufficient) latitude position of the scan project in decimal degree notation. This information helps to improve the accuracy of the inclination sensor, and leads to better scan registration results.
Duplicate a Scan Project
Instead of adding a new, blank project or cluster, you can create new projects by duplicating existing ones. To do so, select the project to be duplicated, then tap Duplicate  at the bottom of the list. The newly created project has the same settings and properties as the original project.
Delete a Scan Project
Select the project to be deleted in the list and tap Delete. If the project or cluster has subordinates, they are also deleted.
How Scan Projects Are Saved
Scan projects are stored on the SSD or SD card depending on the settings in storage management. Projects stored on the SSD can be exported to the SD card.
Editing a Scan Project
To edit a scan project, select it in the list, then tap it again to reach to its details view.
Selecting a Scan Project
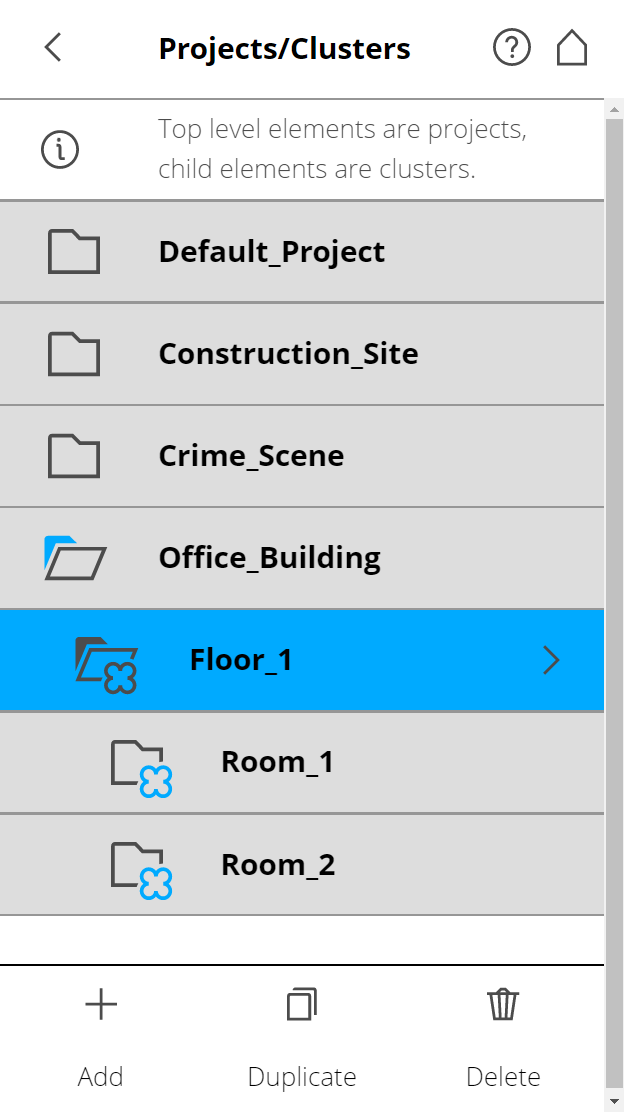
Figure 6-13 Project List
The project list contains the currently selected project, plus all other projects stored on the SSD or SD card.
To select a project, tap it in the list. The selected project is highlighted. To view or change details of the selected project, tap it once more.
To display available clusters of a project, select it to expand the list.
If the list of projects exceeds the screen size, scroll up or down with the scroll buttons at the bottom.
Description of Project Button Icons
|
|
Project |
|
|
Project has clusters that are currently shown (list is expanded accordingly) |
|
|
Cluster |


