Service
|
123-2024-10-21-888 |
![]() Manage > Service
Manage > Service
Notifications - Tap Notifications to see warnings and other status messages. This is not enabled if there are no warnings or errors. Tap an item in the list to view details and possible solutions for the corresponding warning or error. Warnings and errors disappear from the list once they are resolved.
If an empty or full SD card is inserted, the LED turns red and a permanent notification is displayed. Even after the SD card is removed, both warnings remain active until the scanner is shut down.
Internal Mass Storage - Tap to view information about the total, used, and free capacity of the solid state drive (SSD)
SD Card - View details about the currently inserted SD card or format the SD card
Format the inserted SD card.
This operation deletes all scans and other data on the SD card. Always use this formatting function for SDXC cards with a capacity of 64 GB or more, because Windows formats such cards with its own file system, which is not supported by the scanner. See Preparing an SD Card.
Log File - Export the log file to the SD card in a folder called Logfile . Important scanner operations, sensor data, as well as warnings and errors (internal error messages of individual components, error messages shown on the screen), are saved to the log file. Log files are analyzed by FARO employees to help customer service identify problems and their possible causes, as well as improve the functionality of the device.
Backup - Backup scan profiles, operators, and scanner parameters to the SD card to help protect from accidental loss if your scanner hardware or storage media fails. You can then archive the data on another storage device, transferring the modified data back to your scanner.
If you own more than one scanner, you can also transfer operators and scan profiles from one scanner to another without manually re-entering the data.
Backup Name - Tap to enter the name of the back-up package. Data is saved to the following directory on your SD card: /Backup/Your_backup_name/.
After specifying the name of the backup folder, select the data to back up, then tap Backup to start the operation.
Restore - Restore scan profiles, operators, color themes, and scanner parameters from scanner snapshots. See Service
The number behind Operators and Profiles denotes the number of operators, scan profiles on the scanner.
To restore data, it must be saved to an SD card. Create a directory on the SD card called Backup, then copy the folder, along with the data to be restored, into this directory.
When finished, insert the SD card with the data to be restored.
List all backup packages on the inserted SD card. Tap the backup package to be restored. A new screen appears.
Select the data from the backup package to be restored, then tap Restore to start the restoration process.
The restored data overrides existing data on the scanner.
For example, if you want to restore or import scan profiles, all existing scan profiles on the scanner are overridden by the new profiles. The scanner's default profiles remain unaffected by this operation. FARO recommends backing up your data before restoring.
Firmware update - Update the scanner with new firmware versions. See Firmware Update
Factory Settings - Reset the scanner to its factory settings. Use this only in exceptional cases. The scans, scan profiles, scan projects, and operators saved on the scanner are unaffected by this operation.
Customer Support - View the FARO Customer Support contact data.
Command Prompt - Send commands to the scanner. This function is for FARO Service purposes only.
Last Service Date - Date of the last scanner maintenance and certification service.
Warning ID / Error ID - The identification number of the warning or error.
Description - A detailed description of the warning or error.
Possible solution - The notifications consist of an ID followed by a detailed description of the warning or error, as well as a possible solution.
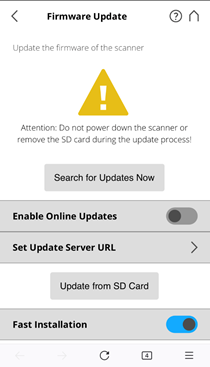
There are two ways to update the firmware of your Focus
- The scanner is online and can fetch the firmware from a server.
- The firmware is transferred using an SD card.
The update process can take up to 40 minutes, depending on the size of the update. The scanner must be connected to power and have a charged battery to begin the firmware update.
Switch Fast Installation on to make installation faster and safer by not updating scanner modules that already have the required version. Disable this option to force updating of all modules. Disabling leads to longer installation times and can increase the risk of unrecoverable failures. We recommend that you keep fast installation enabled.
Online Updates
Enable Online Updates. Slide this button to turn it ON or OFF
Select Set Update Server URL to set the URL link of the server that provides the online firmware updates.
Tap Search for Updates Now to search for firmware updates online.
Update via SD Card
If you have the firmware update file on your computer, you can use the SD card to transfer it to the scanner. Copy the update file to the folder Updates on your SD card. If this folder does not exist, manually create it. Pay attention to lower and uppercase, when entering the folder name. Insert the SD card into the scanner, and tap Update from SD Card.
Risk of data loss and non-functional device!
DO NOT manually shut-down, reset or power-off the scanner during the firmware update process! Any interruption of the firmware update process can result in corruption of the system and making the device inoperable.
After the update is complete, the scanner might automatically restart, depending on the nature of the updates.
