Creating a Clipping Box
|
1238888 |
-
Open a 3D view and navigate to the area of interest.
There are various ways to create a clipping box:
-
Click Auto Clipping Box to get the following options:
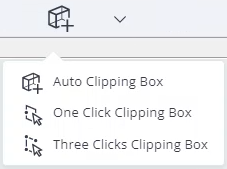
Figure 10-20 Clipping Box dropdown menu
Auto Clipping Box
Click the Auto Clipping Box button in the toolbar.
The clipping box toolbar opens. For details about how to use the toolbar, refer to the section Manipulating a Clipping Box.
A clipping box will be created close to the center of the current 3D view. The created clipping box will be scaled so that it covers roughly two thirds of the screen.
One Click Clipping Box
-
Open the dropdown menu of the Clipping Box button and select entry One Click Clipping Box.
-
Select a point in the 3D view to determine the surface.
The clipping box will then be created with one of its faces being coplanar to the defined surface, and with the selected point in the center. The created clipping box will be scaled so that it covers roughly two thirds of the screen.
Three Clicks Clipping Box
-
Open the dropdown menu of the Clipping Box button and select entry Three Clicks Clipping Box.
-
Select three points in the 3D view to determine the surface.
The clipping box will then be created with one of its faces being coplanar to the surface defined by the three picked points. The clipping box will be scaled in such a way as it exactly encloses the picked points.
Aligned to a Limited or Unlimited Plane Object
Select New > Aligned Clipping Box in the context menu of a plane object to align a clipping box to the object. You can mark a plane by opening the context menu of button Mark Object in the toolbar and selecting Mark Plane  .
.
-
Unlimited plane: The new clipping box will be created as a unit cube centered on the reference point of the plane. Its faces will be parallel to the selected plane.
-
Limited plane: The new clipping box will tightly enclose the boundary polygon of the limited plane.
The created clipping boxes are saved for later use and will be added to a folder ClippingBoxes in the structure view. Those folders are added as follows:
-
New clipping boxes are local, which means, they will be placed below the object the 3D view is opened on.
-
If the overall project 3D view gets opened, created clipping boxes will be global.
-
In scan projects imported from earlier SCENE versions, clipping boxes will stay global.
-
Operations started from a 3D view which operates with clipping boxes will use only the clipping boxes visible in that 3D view.
After you have created the clipping box, you can reposition and resize it.
After it has been created, the rotation point of the view will be set to the center of the clipping box.
Creating clipping boxes does not delete any points from the point cloud. The points outside or within the clipping box are simply hidden and may be displayed again at any time.

