Symbols in the Structure View
|
1238888 |
Note that this list is not exhaustive.
|
Symbol |
Meaning |
|
|
Project Folder |
|
|
Folder for meshes and imported objects |
|
|
Cluster |
|
|
Reference point |

|
Point cloud (also used in the toolbar for the project point cloud) |
|
|
Sphere |
|
|
Plane |
|
|
Slab |
|
|
Pipe |
|
|
Scan path (trajectory) |
|
|
Mesh, imported mesh object |
|
|
Documentation |
|
|
Region |
|
|
Clipping box |
|
|
View point |
|
|
Picture |
|
|
Overview map |
|
|
Fit |

|
Marker |
|
Scans and Cluster |
|
|
|
Fully loaded |
|
|
Loaded in reduced size |

|
Scan |
|
|
Modified scan |
|
|
Virtual scan |
|
|
Reference scan or cluster |
|
|
Fixed scan or cluster |
|
|
Locked Scan Manager |
|
|
Global Origin |
|
|
Missing file |
|
|
Freestyle3D: Not processed completely |
|
|
Freestyle3D: Recoding finished. Some single frames unloaded because of low memory. |
|
|
Freestyle3D: Post processing done |
|
|
Freestyle3D: Reduced quality because of low machine performance |
|
|
Freestyle3D: Capture or Replay |
|
|
Freestyle3D: Next step is Replay |
|
|
Freestyle3D: Next step is Optimize Scans |
|
|
Freestyle3D: Next step is Color Smoothing |
|
|
Freestyle3D: Next step is Stray Point Filter |
|
|
Freestyle3D: Next step is Point Cloud Creation |
|
Fitting |
|
|
|
Active fit |
|
|
Outdated active fit |
|
|
Good quality |
|
|
Compromised quality |
|
|
Medium quality |
|
Registration |
|
|
|
Ignored for Place Scans |
|
|
Object with automatically found correspondence |
|
|
Object with user forced correspondences |


Context Menu Entries for Objects in the Structure View
Plane
New
Reference on Folder Level – Place a copy of the selected object in the reference objects folder of the current scan. The copy does not have any link to a fit object that may exist.
Reference on Workspace Level (i.e. Project Level) – Place a copy of the selected object in the reference objects folder of the workspace. The copy does not have any link to a fit object that may exist.
Intersection Point – Creates an intersection point on the plane at the spot determined by the mouse pointer.
Plane with Border – Creates a new limited plane with border lines from the point selection that was used to create the selected plane.
Slab By Plane – Creates a slab from the plane.
Aligned Clipping Box – Creates a new Clipping Box aligned to the selected plane.
Documentation – Attach an annotation to the selected object.
View > 3D View – View the selected object 3D view.
Visible – Make the selected object visible or invisible.
Operations > Correspondences > Delete Correspondences – Deletes the correspondences of the selected object. You can select to delete user forced, system found or anti-correspondences.
Alignment – modifies the overall orientation of the entire project according to the desired alignment of the plane to a cardinal direction (north, south, east, west, ceiling, ground or custom).
Flip – turns the plane’s Normal for 180 degrees.
Export… – Exports the selected object.
Delete – Deletes the selected object.
Properties... – Opens the properties dialog.
Limited Plane
New
Reference on Folder Level – Place a copy of the selected object in the reference objects folder of the current scan. The copy does not have any link to a fit object that may exist.
Reference on Workspace Level (i.e. Project Level) – Place a copy of the selected object in the reference objects folder of the workspace. The copy does not have any link to a fit object that may exist.
Documentation – Attach an annotation to the selected object.
View > 3D View – View the selected object 3D view.
View Scan Point Distance – Deviations from a level surface relation to
a plane are highlighted color.
Operations > Correspondences > Delete Correspondences – Deletes the correspondences of the selected object. You can select to delete user forced, system found or anti-correspondences.
View Scan Point Distance – Analyze the evenness of the surface. Deviations of the scan points from the plane will be highlighted different colors.
Export… – Exports the selected object.
Set Border from Selection – The border line of the plane is replaced by the border line of the selection.
Delete – Deletes the selected object.
Rename – Renames the selected object.
Plane Fit
Select – The selection that was used to create the fit object is reactivated. The selection combination mode determines how the new selection results from the existing selection and the reactivated selection.
Active – A black check mark indicates whether this fit object is the active fit object of the corresponding object, i.e., whether it is the one that determined the properties of the corresponding object. An object can have several fit objects, of which one at the most can be active.
Update – Recalculates the object parameters. The basis for this is again the selection that was also used to create the fit object.
Flip – turns the plane’s Normal for 180 degrees.
Delete – Deletes the fit object.
Rename – Renames the fit object.
Properties – Opens the properties dialog.
Constrained Plane Fit
Select – The selection that was used to create the fit object is reactivated. The selection combination mode determines how the new selection results from the existing selection and the reactivated selection.
Active – A black check mark indicates whether this fit object is the active fit object of the corresponding object, i.e., whether it is the one that determined the properties of the corresponding object. An object can have several fit objects, of which one at the most can be active.
Update – Recalculates the object parameters. The basis for this is again the selection that was also used to create the fit object.
Delete – Deletes the fit object.
Rename – Renames the fit object.
Properties – Opens the properties dialog.
Sphere
Locate – Displays the selected object in the center and enlarges the active view.
New
Reference on Folder Level – Place a copy of the selected object in the reference objects folder of the current scan. The copy does not have any link to a fit object that may exist.
Reference on Workspace Level (i.e. Project Level) – Place a copy of the selected object in the reference objects folder of the workspace. The copy does not have any link to a fit object that may exist.
Fit – Only available if a selection of scan points exists. Creates a new fit from the selected scan points. Both the sphere position and the sphere radius are ascertained from the scan points.
Fit (fixed radius) – Only available if a selection of scan points exists. Creates a new fit from the selected scan points with a fixed preset sphere radius. The sphere position is ascertained from the scan points.
View > 3D View – View the selected object 3D view.
Operations > Correspondences > Delete Correspondences – Deletes the correspondences of the selected object. You can select to delete user forced, system found or anti-correspondences.
Update Fit – Recalculates the fit of the sphere.
Export... –
Delete – Deletes the fit object.
Rename – Renames the fit object.
Properties – Opens the properties dialog.
Sphere Fit
Select – The selection that was used to create the fit object is reactivated. The selection combination mode determines how the new selection results from the existing selection and the reactivated selection.
Active – A black check mark indicates whether this fit object is the active fit object of the corresponding object, i.e., whether it is the one that determined the properties of the corresponding object. An object can have several fit objects, of which one at the most can be active.
Update – Recalculates the object parameters. The basis for this is again the selection that was also used to create the fit object.
Delete – Deletes the fit object.
Rename – Renames the fit object.
Properties – Opens the properties dialog.
Region
New
Reference on Folder Level – Place a copy of the selected object in the reference objects folder of the current scan. The copy does not have any link to a fit object that may exist.
Reference on Workspace Level (i.e. Project Level) – Place a copy of the selected object in the reference objects folder of the workspace. The copy does not have any link to a fit object that may exist.
Documentation – Attach an annotation to the selected object.
Select – The selection that was used to create the region is reactivated. The selection combination mode determines how the new selection results from the existing selection and the reactivated selection.
Import/Export – Export the region as object.
Delete – Delete the region object. The scan points are not deleted.
Rename – Renames the fit object.
Properties – Opens the properties dialog.
Point
Locate – Displays the selected object in the center and enlarges the active view.
New
Reference on Folder Level – Place a copy of the selected object in the reference objects folder of the current scan. The copy does not have any link to a fit object that may exist.
Reference on Workspace Level (i.e. Project Level) – Place a copy of the selected object in the reference objects folder of the workspace. The copy does not have any link to a fit object that may exist.
Documentation – Attach an annotation to the selected object.
View – Opens a new 3D view of the point.
Set Rotation Point – Sets the rotation point to the center of the scan point.
Visible – Make the selected object visible or invisible.
Operations > Correspondences > Delete Correspondences – Deletes the correspondences of the selected object. You can select to delete user forced, system found or anti-correspondences.
Export… – Exports the selected object.
Delete – Deletes the selected object.
Properties – Opens the properties dialog.
Point Fit
Select – The selection that was used to create the fit object is reactivated. The selection combination mode determines how the new selection results from the existing selection and the reactivated selection.
Active – A black check mark indicates whether this fit object is the active fit object of the corresponding object, i.e., whether it is the one that determined the properties of the corresponding object. An object can have several fit objects, of which one at the most can be active.
Update – Recalculates the object parameters. The basis for this is again the selection that was also used to create the fit object.
Delete – Deletes the fit object.
Rename – Renames the fit object.
Properties – Opens the properties dialog.
Pipe
Select – The selection that was used to create the fit object is reactivated. The selection combination mode determines how the new selection results from the existing selection and the reactivated selection.
Active – A black check mark indicates whether this fit object is the active fit object of the corresponding object, i.e., whether it is the one that determined the properties of the corresponding object. An object can have several fit objects, of which one at the most can be active.
Update – Recalculates the object parameters. The basis for this is again the selection that was also used to create the fit object.
Delete – Deletes the fit object.
Rename – Renames the fit object.
Properties – Opens the properties dialog.
Pipe Fit
Select – The selection that was used to create the fit object is reactivated. The selection combination mode determines how the new selection results from the existing selection and the reactivated selection.
Active – A black check mark indicates whether this fit object is the active fit object of the corresponding object, i.e., whether it is the one that determined the properties of the corresponding object. An object can have several fit objects, of which one at the most can be active.
Update – Recalculates the object parameters. The basis for this is again the selection that was also used to create the fit object.
Delete – Deletes the fit object.
Rename – Renames the fit object.
Properties – Opens the properties dialog.
Line
Select – The selection that was used to create the fit object is reactivated. The selection combination mode determines how the new selection results from the existing selection and the reactivated selection.
Active – A black check mark indicates whether this fit object is the active fit object of the corresponding object, i.e., whether it is the one that determined the properties of the corresponding object. An object can have several fit objects, of which one at the most can be active.
Update – Recalculates the object parameters. The basis for this is again the selection that was also used to create the fit object.
Delete – Deletes the fit object.
Rename – Renames the fit object.
Properties – Opens the properties dialog.
Line Fit
Select – The selection that was used to create the fit object is reactivated. The selection combination mode determines how the new selection results from the existing selection and the reactivated selection.
Active – A black check mark indicates whether this fit object is the active fit object of the corresponding object, i.e., whether it is the one that determined the properties of the corresponding object. An object can have several fit objects, of which one at the most can be active.
Update – Recalculates the object parameters. The basis for this is again the selection that was also used to create the fit object.
Delete – Deletes the fit object.
Rename – Renames the fit object.
Properties – Opens the properties dialog.
Rectangle
Select – The selection that was used to create the fit object is reactivated. The selection combination mode determines how the new selection results from the existing selection and the reactivated selection.
Active – A black check mark indicates whether this fit object is the active fit object of the corresponding object, i.e., whether it is the one that determined the properties of the corresponding object. An object can have several fit objects, of which one at the most can be active.
Update – Recalculates the object parameters. The basis for this is again the selection that was also used to create the fit object.
Delete – Deletes the fit object.
Rename – Renames the fit object.
Properties – Opens the properties dialog.
Rectangle Fit
Select – The selection that was used to create the fit object is reactivated. The selection combination mode determines how the new selection results from the existing selection and the reactivated selection.
Active – A black check mark indicates whether this fit object is the active fit object of the corresponding object, i.e., whether it is the one that determined the properties of the corresponding object. An object can have several fit objects, of which one at the most can be active.
Update – Recalculates the object parameters. The basis for this is again the selection that was also used to create the fit object.
Delete – Deletes the fit object.
Rename – Renames the fit object.
Properties – Opens the properties dialog.
Scan
Visible – Make the selected object visible or invisible.
View
3D View – View the scan 3D view.
Planar – View the scan planar view.
Quick – View the scan quick view.
Locate – Resumes the initial perspective of the view. 3D view the rotation point will be set to the position of the scanner.
Loaded – Loads the scan points of the scan. Here a check mark shows whether the scan points of a scan are loaded.
Point Cloud – Create or delete a Scan Point Cloud from the scans within the scan folder or cluster.
Create Scan Point Cloud – Create a Scan Point Cloud from the scans within the scan folder or cluster.
Delete Scan Point Cloud – Delete a Scan Point Cloud from the scans within the scan folder or cluster.
Send to WebShare Cloud – Export the Point Cloud to WebShare. An account is required.
Export
Image – Obtains an overview image from the scan points and saves it the file system the same folder as the scans.
Objects – Export the objects of this scan.
Scan Points –
- Export Scans – unordered to export the scan points of the selected scan.
- Export Scan Point Clouds – ordered to export the point cloud of the selected scan.
As Project –
Delete – Deletes the scan from the workspace. The associated file is not deleted.
Properties – Opens the properties dialog.
For Unprocessed Handheld Scans
Operations > Registration
Level
- by picking one point, if the plane has an even surface.
- by picking three points, if the plane is uneven, or if you need a high accuracy.
Process the scan – Processes the steps Replay, Optimize Scans, Color Adjustment, and Stray Point Filtering.
Global System > Set as Global Origin – Select to work the local coordinate system of the scan. The scan will be marked with a red G to indicate that it is currently defining the Global Coordinates system.
Create virtual scans – creates one or several virtual scans from a scan. Virtual scans are required if you want to export handheld scan projects to WebShare.
For Processed Handheld Scans
Operations > Registration
Level
- by picking one point, if the plane has an even surface.
- by picking three points, if the plane is uneven, or if you need a high accuracy.
Fixed Scan – Mark the scan alignment as fixed and exclude it from further automatic registration attempts.
Reference Scan – Set the scan as reference scan.
Find Objects – Detect checkerboards, spheres, planes, corner points, rectangles or lines the scan.
Filter – Apply filters to the scan.
Preprocessing > Preprocess Scan – Opens the preprocess menu dialog. With the preprocess option you may apply a series of processing steps such as filters, automatic object detection or scan registration to the scan. The scan is automatically loaded, processed, saved and unloaded again.
Correspondences > Delete Correspondences – Deletes the correspondences of the scan and of its objects. You can select to delete user forced, system found or anti-correspondences.
Preprocessing > Preprocess Scan – Opens the preprocess menu dialog. With the preprocess option you may apply a series of processing steps such as filters, automatic object detection or scan registration to the scan. The scan is automatically loaded, processed, saved and unloaded again.
Correspondences > Delete Correspondences – Deletes the correspondences of the scan and of its objects. You can select to delete user forced, system found or anti-correspondences.
Delete inactive Fits – Deletes all inactive fit objects.
Color/Pictures
Apply Pictures – Apply the color information of the picture onto the scan. Position, orientation, and zoom factor of the camera are already known. This command is only available if the pictures reside inside a scan.
Adjust Picture Angles – Adjust the picture angles.
Export All Pictures – Exports all pictures of the scan (if the scan has been recorded color). Opens a dialog to select the storage location and the export format of the pictures. You can select between Original format and jpg. Original Format will export the pictures without changing their format; jpg will convert the pictures and save them as JPG.
Import All Pictures – Opens a dialog to select the storage location of the pictures you want to import. This option is only available for scans which already contain pictures.
Color Contrast Filter – Enhances the dynamic range of the color pictures.
Restore Gray Image – Remove the color information and restore the original reflectance values.
Replace Color Overlay – Import a manually edited picture to replace the scan’s initial color overlay with this picture. See chapter Enhancing the Color Overlay for more information.
Export Color Overlay – Export the scan's color overlay as a picture to your local hard drive.
Point Cloud Tools – Create a scan point cloud from the scan or delete an existing scan point cloud.
Global System
Create virtual scans – creates one or several virtual scans from a scan. Virtual scans are required if you want to export scan projects made by handheld scanners to WebShare.
Import / Export
Export Objects – Export the objects of this scan.
Export Scan Points – Export the scan points of the selected scan. This applies to the points of the scan only and does not export the scan points of any possible scan point cloud.
Export Scan Point Cloud – Export the scan point cloud of the scan.
Export as Project –
Export Image – Obtains an overview image from the scan points and saves it the file system the same folder as the scans.
Export Compensation – Write compensation data to a file.
Export Scan Parameters – Export the parameters of the scan.
Import Compensation – Import compensation file and use immediately. You may not be able to import a compensation if the scan points were changed by a filter beforehand and have not been saved again.
Save Objects Scan – Save the objects of the scan the scan file.
Delete – Deletes the scan from the project
Scan Fit
Update – Recalculates the object parameters. The basis for this is again the selection that was also used to create the fit object.
Delete – Deletes the fit object.
Rename – Renames the fit object.
Properties – Opens the properties dialog.
Scans Folder / Cluster
Visible – Make the selected object visible or invisible.
View – Open the scans and objects of the scan folder, the correspondence view, the 3D view or the structure view.
Locate – Resumes the initial perspective of the view. 3D view the rotation point will be set to the position of the scanner.
Loaded – Loads the scan points of the scan. Here a check mark shows whether the scan points of a scan are loaded.
Process Scan – Opens the Configure Processing page to configure the for processing and start processing.
Point Cloud – Create or delete a Scan Point Cloud from the scans within the scan folder or cluster.
Create Scan Point Cloud – Create a Scan Point Cloud from the scans within the scan folder or cluster.
Delete Scan Point Cloud – Delete a Scan Point Cloud from the scans within the scan folder or cluster.
New – Create a new Cluster within the scan folder.
Delete – Deletes the fit object.
Rename – Renames the fit object.
Properties – Opens the properties dialog.
Export
Scans –
- Export Scans – ordered to export the scan points of the selected scan.
- Export Scan Point Clouds – unordered to export the point cloud of the selected scan.
As Project –
Images – Obtains 360° photos of the planar view of each scan and saves these images the file system the same folder as the scans.
Delete – Deletes the scan folder and all the scans it from the project. The files belonging to the scans are not deleted.
Rename – Renames the fit object.
Properties – Opens the properties dialog.
Scan Manager
Lock all – locks the Scan Manager of the cluster and the Scan Managers of subordinated clusters.
Unlock – The cluster and all its superordinate and subordinate clusters will be unlocked.
Unlock All – unlocks the Scan Manager of the cluster and the Scan Managers of subordinated clusters.
Delete – Deletes the Scan Manager.
Rename – Renames the Scan Manager.
Properties – Opens the Scan Manager.
Virtual Scan (3D Picture)
The virtual scan is treated as a normal laser scan.
Visible – Make the selected object visible or invisible.
View > 3D View – View the scan 3D view.
Locate – Resumes the initial perspective of the view. 3D view the rotation point will be set to the position of the scanner.
Export
Image – Obtains an overview image from the scan points and saves it the file system the same folder as the scans.
Objects – Export the objects of this scan.
Scan Points – Export the scan points of the selected scan. This applies to the points of the scan only and does not export the scan points of any possible scan point cloud.
As Project –
Delete – Deletes the scan from the project. The associated file is not deleted.
Properties – Opens the properties dialog.
3D Picture Fit (Fit of a Virtual Scan)
Select – The selection that was used to create the fit object is reactivated. The selection combination mode determines how the new selection results from the existing selection and the reactivated selection.
Active – A black check mark indicates whether this fit object is the active fit object of the corresponding object, i.e., whether it is the one that determined the properties of the corresponding object. An object can have several fit objects, of which one at the most can be active.
Update – Recalculates the object parameters. The basis for this is again the selection that was also used to create the fit object.
Delete – Deletes the fit object.
Rename – Renames the fit object.
Properties – Opens the properties dialog.
Correspondences
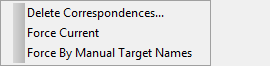
Figure 16-1 Context menu: Scan folder > Operations > Correspondences
Delete Correspondences – Deletes correspondences of the scan folder, its scans and of all objects that belong to its scans. You can select to delete user forced, system forced, system found or anti-correspondences.
Force Current – Force all already existing correspondences of the scan folder.
Force by Manual Target Names – Forces correspondences by manually created reference name.
Preprocessing > Preprocess Scans – Opens the preprocess menu dialog. With the preprocess option you may apply a series of processing steps such as filters, automatic object detection or scan registration to the scans of the scan folder. The scans are automatically processed and saved.
Delete inactive Fits – Deletes all the inactive >.
Global System > Set as Global Origin – Select to work the local coordinate system of the scan folder. The scan folder is now marked with a red G  to indicate that it is currently defining the global coordinate system.
Import/Export
Export Objects – Export objects. Note, scans need not to be loaded and are therefore not loaded automatically.
Export Project –
Export Images – Obtains 360° photos of the planar view from all the scans in the project. The scans are loaded one after the other, the 360° photo is created, then saved and then unloaded again.
Export Positions –Saves the position specifications of all scans and reference objects.
Assemble Meshes –
Delete – Deletes the fit object.
Rename – Renames the fit object.
Properties – Opens the properties dialog.
Visibility
3D Visibility – Opens the dialog with the default visibility for quick view and 3D views.
Planar View Visibility – Opens the dialog with the default visibility for the planar view.
Layer Manager – Opens the dialog box of the layer manager.
Viewpoint
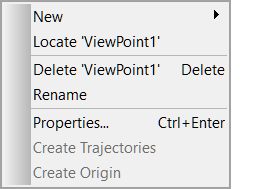
Figure 16-2 Context menu: Viewpoint
New – Create a new Point, Sphere, Checkerboard, Circular Flat Target, Corner Point, Plane, Slab, Documentation Object, Folder or Scan Folder in the project.
Activate – Go to the selected viewpoint the current 3D view.
Delete – Deletes the fit object.
Rename – Renames the fit object.
Properties – Opens the properties dialog.

