 Satellite
Use Place Satellite Image to search for a satellite image to place into your drawing.
Choose one of the following:
Google Maps is the default satellite image provider; however, you can change the default to Bing Maps in Preferences.
To set the default map provider:
-
From the quickbar, click
 Preferences.
 -
From the General tab, click the Default Satellite Map and select the provider.
-
Close Preferences.
Import a satellite Image with Google Maps
-
From the Home ribbon, click Place Satellite Image.
-
From the Google Maps Dialog Box, find and configure the image to place.
-
Use the mouse wheel to zoom to the desired view, and then click Place Map Image. The selected view is placed on its own layer in the drawing.
-
Use the Maps tool panel to edit the image.
-
From the drawing, you can double-click a Google map image to open the Google Map tool to the same center and scale (zoom), and size. This is useful for adding to existing map sections.
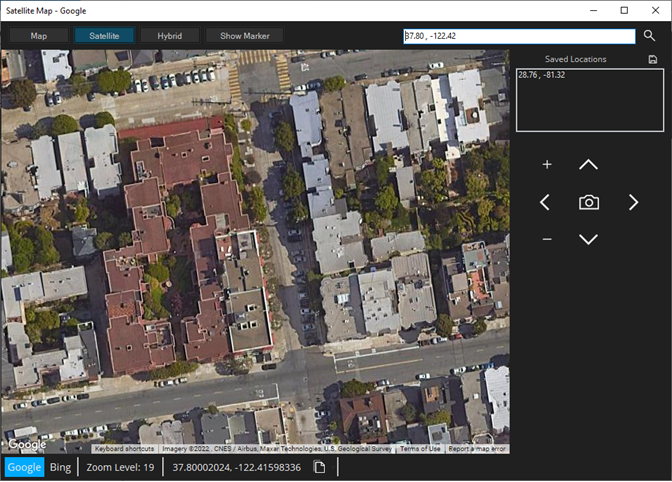
Google Maps Dialog Box
|
Map Satellite Hybrid |
Select the map style. Map - Standard Google map Satellite - Satellite map image Hybrid - The satellite image that also contains aspects of the Google map.
|
| Search field |
In the address field, enter the address, name of a business, etc. and then click Search. You can also search Latitude and Longitude coordinates. |
| Saved Locations |
Click Add to save the location of the current map. Click Delete to remove the saved location. |
| Tiling Tool |
Use this tool to place map tiles. |
| Google|Bing | You can switch between Google and Bing map data sets. One map may be more current, or the image may be of better quality. You can place, tile, and add terrain to both map types. |

Tiling Tool
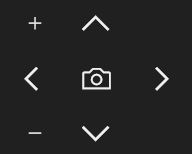
The tiling tool allows you to add adjacent images to your map image. Using tile images works much better for rendering, etc. than one large map image. Position the map tile in the viewer, and then use the arrows to move to areas surrounding the center image. Tools are as follows:
-
Increment arrows – Moves to the next section of the map.
-
Place Map – Places a map section.
-
Delete - Delete a placed image.
Maps tool panel
Select the drawing to display the Google Map or Bing Map tools panel. The following options are available:
| GPS (Center of Map) |
View or change the GPS coordinates of the image. |
| X, Y, and Elevation coordinates |
Adjust the position of the image along the axes. |
| Aspect Lock |
Lock the aspect so that it cannot by modified. |
| Show Terrain |
Display or hide the terrain display on/off. To modify the map, perhaps to smooth or raise an area, activate Show Terrain. Points will display. You can delete or drag them to adjust the terrain. Click Generate Terrain to view your changes. |
| Google Terrain |
Add Google Terrain map info to the drawing. |
| Generate Terrain |
Apply changes that you made to the terrain. |
| Image Properties |
Adjust the following image settings: Width - Adjust the image area’s width (in feet). Height - Adjust the height of the image area (in feet). Yaw - Adjust the image’s yaw setting (in degrees). Roll - Adjust the image’s roll setting (in degrees). Pitch - Adjust the image’s pitch setting (in degrees). Transparency - Adjust the image transparency. This option is useful for layered images in which you need to display aspects from multiple images. Fade - Adjust the fade of the image starting at the edges. Contrast - Adjust the detail contrast of the image. Show Mesh - Show the image’s mesh layer. Use Lighting Effect - Adjust the lighting to display greater details of the image. Mesh X|Mesh Y - Adjust the size of the mesh triangles which display when Show Mesh is selected. |
You can draw lines, analyze the slope with the Slope Calculator, and create animation.
Use these additional tools to adjust the image.
 Convert Convert |
The following map image conversion tools are available:
Picture - Convert the map image to a picture.
Bubble Picture - Convert the map image to a bubble picture.
File Reference - Use File Reference to insert an image reference marker which you can double-click to display the image. Image options in File Reference are similar to those available for Bubble Picture; however, you can adjust the Yaw, Pitch, and Roll settings. |
 Layer Manager Layer Manager
|
Open the Layer Manager to select, or add a layer for the image. |
 Remove Cars/Image Clean out Remove Cars/Image Clean out |
Use the Image Clean Out tool to remove cars or other objects from the image. See Removing Cars and Cleaning Out Images. |
 Horizontal Align Horizontal Align |
Adjust the horizontal alignment of the map image. |
 Launch Satellite Map Launch Satellite Map
|
Re-open the image in the Satellite Map tool. |
| X, Y, Z Values |
Displays X, Y, Z values, which you can change by entering values or by using the dial arrows. |
| Terrain Settings |
You can add terrain to the map with one of the following tools: Generate from Google - Import 3D terrain data from Google and apply it to the map. You can also use this with maps imported from Bing. Generate from User Data - |
| Rotate |
Configure the rotation of the placed image in the diagram. |
| Bubble Size |
Configure the size of the bubble photo (in feet). |
| Arrow Size |
If the Arrow option is enabled, use this setting to configure the size of the arrow. |
| Extrude |
Use the settings to configure a depth effect for the image. |
| Border |
Select the color of the border to use for the bubble picture. |
| Arrow |
Display an arrow along with the bubble image. |
| Is Pano Image |
Enable this option if you are using a panoramic photo. |
| Picture Viewer |
Displays photo editor dialog that allows you to perform a variety of functions to the bubble photo. |
| Browse |
Open File Explorer to select another image for the bubble photo. |
| Orientation |
Use controls to change the Yaw, Pitch, and Roll of the bubble photo. |
Export and Import a Google Map Image
You can use third-party software to edit Google Map images prior to, or after editing them in FARO Zone 3D.
To export or import a modified map:
-
Place the desired Google Map image.
-
Right-click the image and select Export Image from the context menu.
-
Choose a folder in which to save the image file.
-
Modify the map in a third-party editing program and then save the file.
-
Right-click in the scene, and select Replace Image. The original image is replaced with the updated one.
