Cable Connections
|
1238888 |
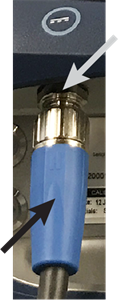
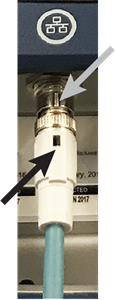
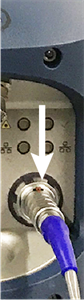
There are four different cable connectors on the Vantage cabling. There is an alignment indicator on each cable connector and the socket for each connection. Ensure the indicators are aligned before trying to insert a cable.
|
|
|
|
|
DC Power cable |
Ethernet cable |
Remote Air Temperature Sensor cable |
|
Figure 4-10 Aligning the Indicators |
||
-
Remote Air Temperature Sensor cable - Insert the connector until it snaps into the socket and locks. Pull the blue grip back to unlock the connector.
-
Ethernet cable - Insert the connector and twist the locking ring clockwise approximately ¼ turn. Twist the locking ring counterclockwise to unlock the connector.
-
DC Power cable - Insert the connector and twist the locking ring clockwise until hand tight. Twist the locking ring counterclockwise to unlock the connector.
-
AC Power cable - Insert the connector and twist the locking ring clockwise until hand tight. Twist the locking ring counterclockwise to unlock the connector.
Installation
-
Make sure that the power switch on the Vantage is in the “Off” position. This is an momentary switch which defaults to “Off”.
-
Connect the Remote Air Temperature Sensor to the port on the rear panel of the Vantage.
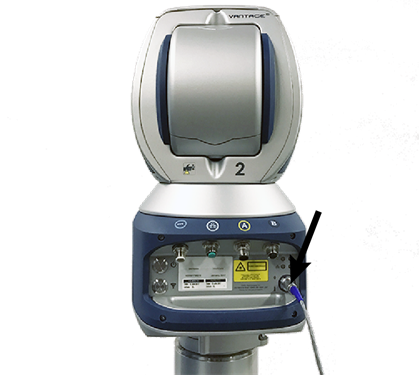
Figure 4-11 Connecting The Remote Air Temperature Sensor
-
Connect the Ethernet cable from the rear panel of the Vantage to your computer’s network port.
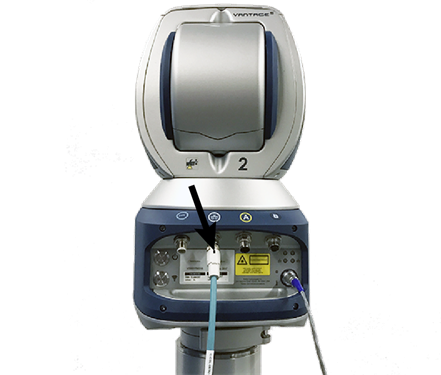
Figure 4-12 Connecting the Ethernet Cable
-
Connect the DC Power cable from the rear panel of the Vantage to the DC Input connector of the Power Supply.
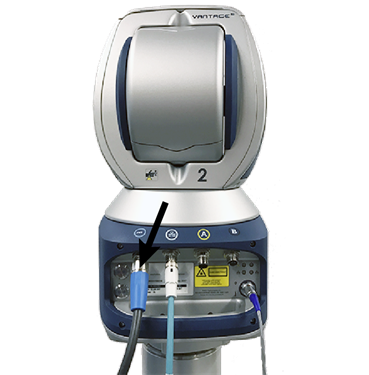

Figure 4-13 Connecting the DC Power Cable
-
Connect the AC Power cable to the AC Input connector on the Power Supply and the three prong plug to 120 or 240 VAC power source.

Figure 4-14 Connecting the AC Power Cable
FARO recommends to use an Uninterruptible Power Supply (UPS) between the power source and the Power Supply.
Computer Configuration
The Vantage requires a Intel® Pentium® Core™ i5-4200M, Dual Core 2.5GHz processor PC (or better), running Windows 7 (or better), with an Ethernet card.
-
Only one Ethernet card should be enabled, and the Windows firewall turned off.
-
Set your Ethernet card TCP/IPv4 to a static IP address of 128.128.128.10, with a subnet mask of 255.255.255.0. In Windows 10:
-
Click Start > Settings.
-
Click Network & Internet.
-
Click Change Adapter Options.
-
Double-click your ethernet adapter card.
-
In the Ethernet Status dialog box, click Properties.
-
Choose the Internet Protocol Version 4 (TCP/IPv4) and click Properties.
-
Select the Use the Following IP address radio button and enter the static IP address (128.128.128.10) and Subnet mask (255.255.255.0).
You can set the Vantage to operate in DHCP mode. For more information, see Change Network Settings.
-
-
The Vantage system’s factory IP address is 128.128.128.100. Connecting to the Vantage requires the supplied Ethernet cable.
You can also enter your Vantage ID. The Vantage ID is the last four digits of the Vantage serial number.
-
Start FARO CAM2 2021 , open the Device Control panel, and add a FARO Laser Tracker Device. The default IP address for the Vantage is 128.128.128.100. For more information, see Device Center Panel.
You can also enter your Vantage ID.
If you need to set the Vantage to a specific IP address, start TrackerPad and start Change Network Settings.
