Run a Volume Analysis
|
1238888 |
With the volume analysis, you can evaluate the volume of stockpiles or depressions in a point cloud.

Figure 1-146 Volume analysis of a stockpile
To create an analysis:
-
In the 3D view, click the
 icon in the toolbar on the right side.
The cursor changes to crosshairs.
-
Click to create a polygon of the area you want to analyze.
This initiates the analysis. -
In the Analysis toolbar, open the topmost dropdown and select the Volume entry.
This will enable the volume analysis settings. -
Adapt the volume analysis settings, see below.
-
To save the analysis in the project permanently, click the
 icon in the analysis toolbar.
Note that you need at least the Project Editor role to save the volume analysis.
Settings in the for the Volume Analysis in the Analysis Toolbar
You can make further settings in the analysis toolbar. ![]() icon for an existing analysis.
icon for an existing analysis.
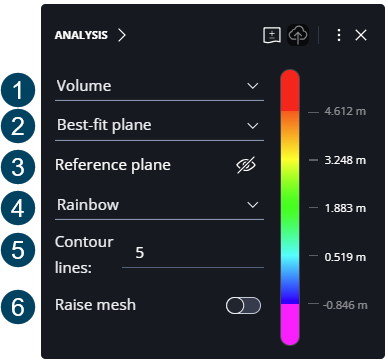
Figure 1-147 Expanded volume analysis toolbar
 If you select Volume from this dropdown, the volume analysis settings are enabled.
 Determines how the reference plane is displayed.
-
Best fit plane: The best fit plane is fitted through the points you picked to create the polygon.
-
Level - lowest point: Displays the reference plane at the lowest point. This might be below the point cloud.
-
Level - highest point: Displays the reference plane at the highest point. This setting is useful to analyze depressions or holes in the ground.
-
Level - elevation: Computes the best fit plane to the defined elevation.
 Reference plane: Shows or hides the reference plane at the selected position.
 Color scale. The color scale compares the points with the selected reference plane type. Then it colors each point with its deviation to the reference plane.
 Contour lines: Draws lines at the boundaries between colored areas. This makes the differences in elevation more visible.
 Raise mesh: If you activate this switch, the mesh is displayed above the actual point cloud.
