Register two Point Clouds
|
1238888 |
The registration involves the following steps:
-
Visual registration: This is a manual alignment of the point clouds. This step is required for running an automatic registration.
-
Automatic registration: Runs a fine registration. When the registration is finished you can save the result in a merged point cloud. The original point clouds remain in the project.
You can register two point clouds to align them in common coordinate system. If your project has more than two point clouds, you can simply repeat the procedure described below.
If you have pre-aligned the scans in the Stream app, you can skip the point cloud alignment.
-
Currently only Orbis scans and .laz point clouds are supported in the registration procedure.
-
The point clouds must be in the same area.
-
A workflow is available for Blink, Orbis and Focus scans, see Upload, Process and Register Scans.
-
Click the three-dots icon
 of the point cloud to open the dropdown menu.
 -
Select menu entry Register to ...
-
From the submenu select the point cloud you want to register the current point cloud to.
This is the reference point cloud.
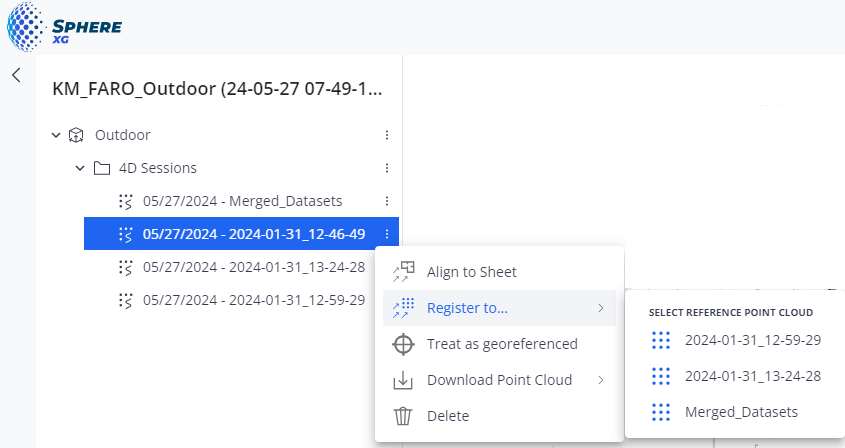
Figure 1-210 Context menu - Register to
The registration view is opened, see figure below.
Do a Visual Registration
The registration shows the point cloud you want to register (orange in the figure below) and the reference point cloud (blue in the figure below) in different colors. Note that for the visual registration, you can only move the point cloud you want to register and not the reference point cloud.
Orbis scans with mobile scans and Flash point clouds are shown in the same color during the registration.
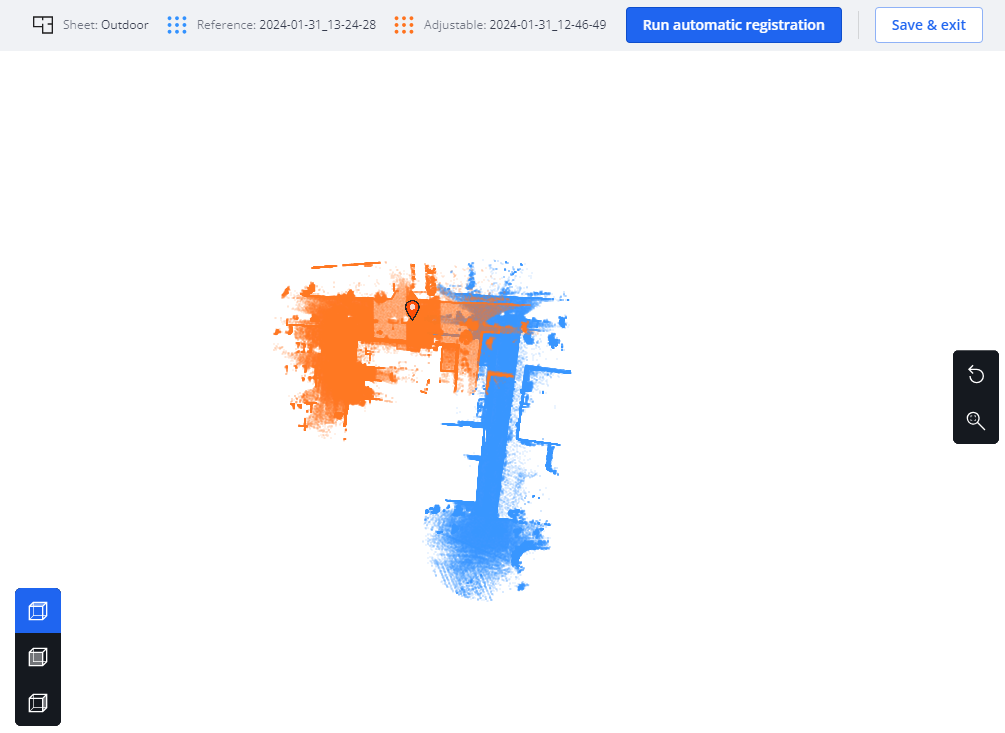
Figure 1-211 Visual registration
You can use the toolbar buttons to show the view you want or to reset an adjustment and recenter the view, see below.
Translate (move) the point cloud:
-
Click to insert an anchor point into the point cloud.
The anchor point is displayed as a red icon .
. -
Click and hold the mouse key pressed, then drag the point cloud to the position you want.
When you hover over the anchor point, the mouse pointer changes to a translation pointer.
Right-click the anchor point if you want to remove it.
Rotate the point cloud:
Click and hold the mouse key pressed anywhere in the point cloud (not on the anchor point), then rotate the point cloud.
When you hover the mouse pointer outside an anchor point, the mouse pointer changes to a rotation pointer.
Save and exit:
If you want to save the visual registration result and come back later for the automatic fine registration, click the Save & exit button on the top right side of the screen.
Registration Toolbars
|
|
Activates the top view of the two point clouds. |
|
|
Activates the front view of the two point clouds. |
|
|
Activates the right-side view of the two point clouds. |
|
|
Resets the last adjustment to the point cloud you want to register against the reference point cloud. |
|
|
Recenters the view. |
Run an Automatic Fine Registration
You can only run an automatic registration after you have completed the visual registration.
-
Click the Run automatic registration button.
The automatic registration starts. While it is running, you cannot change anything on the screen. Note that the registration may take some time. A progress wheel will show the percentage of completion.
When the automatic registration is finished, a confirmation message is displayed informing you whether the registration was successful.
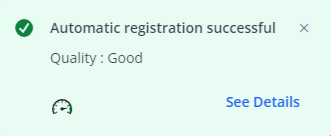
Figure 1-212 Confirmation message
-
Click link See Details or icon
 on the right side of the screen to open the registration report
Currently you can only open this report while you are still in the registration view. If you might need the registration report later, you should make a screenshot.
-
Click the Save & exit button to save the registration result and leave the registration view.
You are redirected to the Sphere XGViewer.
Registration Report
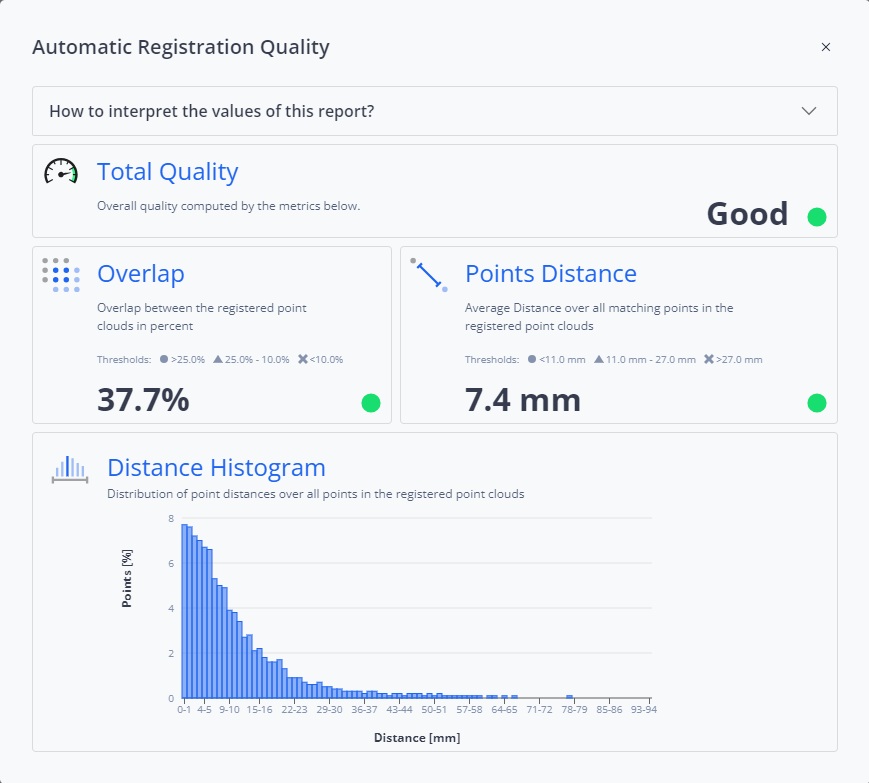
Figure 1-213 Registration report
How to interpret the values of this report?
-
Open this dropdown list to learn more about the value interpretation of the registration report, i.e. whether the registration is considered good, medium or poor.
-
Select the threshold that matches your capture.
-
The Mobile mapping capture threshold should be used for mobile mapping devices, e.g. the FAROOrbis.
-
The Stationary scan capture should be used for stationary laser scanners, e.g. the FARO Focus.
For more information on the Orbis scanner, see the Orbis user manual.
Details about the thresholds are displayed for the parameters Overlap and Points Distance.
-
Circle: Indicates good quality.
-
Triangle: Indicates medium quality.
-
x: Indicates poor quality.
In addition, colors green, yellow and red are used to illustrate the registration quality.
