 FARO FotoPoints
Use FAROFotoPoints to convert a set of photos from a drone, SLR camera, or phone camera to a point cloud which you can use in FARO Zone 3D .
For information on taking photos that you want to convert to point clouds, see FotoPoints Guidelines and Tips.
You can also create a point cloud from a video. See Creating a Point Cloud from a Video.

To convert a set of photos to a point cloud:
-
From the Point Cloud ribbon, select FARO FotoPoints Import.
-
From Input Folder, select the folder that contains the images.
-
From Output Folder, select the destination folder for the .lsproj (point cloud) file.
-
Select a Quality setting. The lowest quality setting results in faster processing, but creates a low-quality point cloud. The Low setting is useful for ensuring that all of the photos in your photo set can be converted to a point cloud. The High setting requires a longer processing time. The High setting can take several hours, depending on the number of photos.
-
Select from the following Scale Options:
-
If you selected Use GPS Data for Scaling or Manual Scaling, click Convert to begin the operation. If you selected one of the other scale options, see the section that describes it.
The FotoPoints tool opens .
.
| Use GPS Data for Scaling | In some cases, drone photos contain GPS data. If your images contain GPS data, this is the preferred setting for scaling. |
| Use Scalebar for Scaling | Use the Scalebar to identify a part with known dimensions. You'll need to identify the part with set points in multiple images. See Using a Scalebar to Size an Object. |
| Use GCP | Use Ground Control Points (GCP) if they are available in the drone images. See Ground Control Points (GCP). |
| Manual Scaling | Ignore scaling. |
The status window displays the status of the conversion, and the preview window displays the images as they acquire. You can click an image file path to display the image in the preview window.
Depending on your computer, the number of images, and image quality, processing can take from a few minutes to several hours. If you need to cancel the operation, close the FARO fotoPoints dialog box.
7. When the operation completes, you are prompted to import the point cloud. Click Yes to open the point cloud created from the images.
A log file is created in the Images folder. Open the log file to view results for images in the set. The log file displays the number of points, and lists photos that did not convert properly.
Using a Scalebar to Size an Object
To scale the resulting point cloud correctly, you can apply a scalebar to an area in the drawing with a known dimension that appears in multiple images. For example, you can use a ruler, the width between two parts of the image, or some other form of distance marker.
To use a scalebar:
-
When you are setting up your project in the FotoPoints tool, From the Scale Options dropdown, select Use Scalebar for Scaling.
-
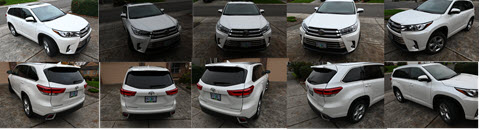
In the Scalebar dialog, enter the length of the scalebar. This is the known dimension on an object in the photo. For example, if you are creating a point cloud from images of a car, you could designate the exact measurement of the length of the hood. Select the unit of measure from the dropdown.
-
Choose an image that shows a clear view of the object to use for the measurements.
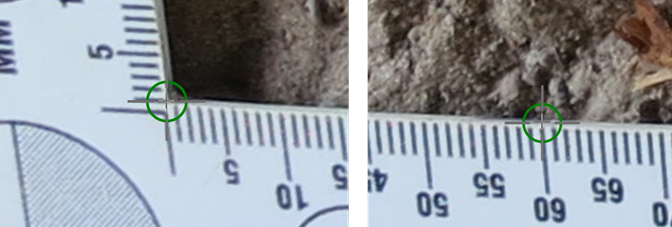
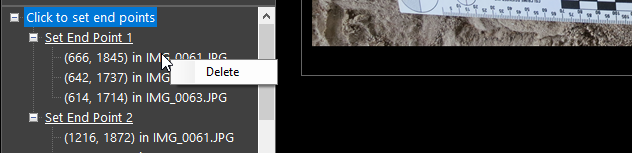
- Click Set End Point 1 and set the first end point in the image. Use the mouse wheel to zoom in, and pan with the right mouse button. You will see the end point mark after the end point is set. Re-click Set End Point 1 if you need to pick a different position.
- Click Set End Point 2 to set the 2nd end point. Note that 2nd end point does not need to be in the same image, so you can choose another image that shows a better view of end point 2.
-
View the endpoints from multiple angles in each image to ensure accurate placements.
-
Set the end points on clearly-identifiable areas in the images, such as object edges, corners, or points.
-
Apply end points to areas that highly-contrast with the color and brightness of surrounding areas. Choose areas that are not: reflective, completely white, very dark.
-
Ensure that the scalebar length is correct.
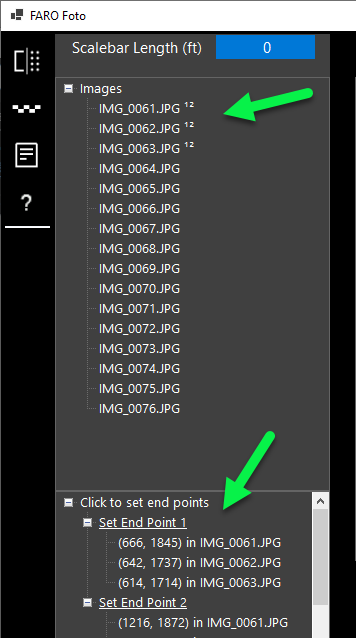
- Select more images (at least 2 images). As you select images, the images in the list display with superscripts for the endpoints that you have set. The coordinates for the set points appear in the lower left.
- After you set end points in at least two images, click Apply. This returns you to the Convert page.
- You are prompted to import the image into your drawing.

Following are some tips for setting end points:
If you need to delete a point, select the point in the dropdown, or right-click the point and select Delete.
Review the FotoPointsworkflow to see other steps you can follow for finalizing the point cloud. See the FARO FotoPoints Example Project
Ground Control Points (GCP)
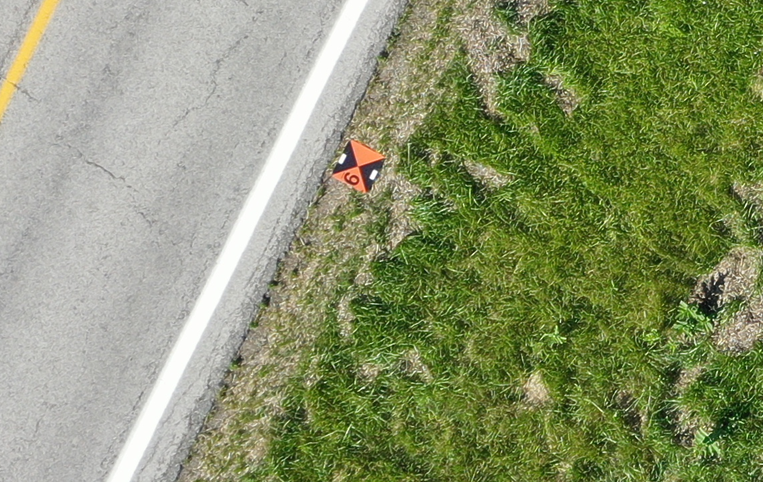
Ground Control Points (GCPs) are reference markers with known coordinates that are located on the ground and captured along with the drone images. GCPs can improve the accuracy of aerial imagery collected by drones.
Drones can use GCPs for the following:
-
Calibration: The use of GCPs helps to calibrate the drone's camera to ensure that images are correctly oriented and scaled.
-
Accurate alignment: With GCPs, drone imagery can be accurately aligned with real-world coordinates (geoconferencing). Real Time Kinematics (RTK) GPS coordinates yield best results.
-
Image tiling: When creating large images from multiple drone images, the use of GCPs can ensure that the images are tiled accurately.
The drone operator places GCPs in the field prior to the drone flight, usually using a GPS receiver or total station to record precise coordinates. During the flight, the drone captures aerial images of the area of interest, and these images can be used with FotoPoints to improve the accuracy of the data.
To use GCPs:
-
In the FotoPoints window, click GCP.
-
Do one of the following:
-
To import the GCP data, see Importing GCP data from the text file.
- To manually input the data, open the text file that contains the Ground Control Point coordinates and find the data the markers that you want to set up.
-
-
Click Enter next to GCP Coordinates and enter the GCP points from the text file. You can rename the IDs to match the GCP marker names. You can copy/past the coordinates from the text file. Click Add GCP to add additional GCPs. Change the unit type, if necessary.
-
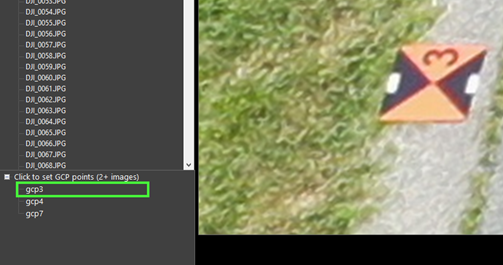
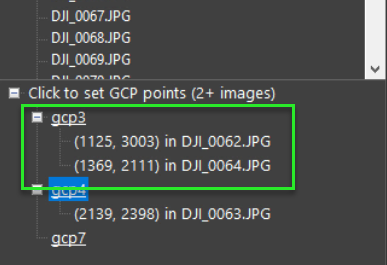
Find 3+ images that clearly show the GCP marker. Use the mouse wheel to zoom in/out of the image. Note the image file names.
-
Select the first image that contains the GCP marker, and then click the GCP entry.
-
Position the crosshairs over the marker in the drawing and click to set it.
-
Locate another photo that includes the marker and repeat the process. The photos in which you set the marker GCPs appear under the GCP entry.
-
Repeat the process for the other markers. You'll need to do this for at least three GCP entries.
-
Click Apply.
-
Return to the
Convert Images panel and click Convert to create the point cloud.


Importing GCP data from the text file
Import the GCP data from the text file to quickly populate the fields in the GCP Manager.
To import GCP data:
1. From the FotoPoints window, click GCP.
2. Click GCP Manager.
2. Click Import GCP. The Coordinate Data Table displays.
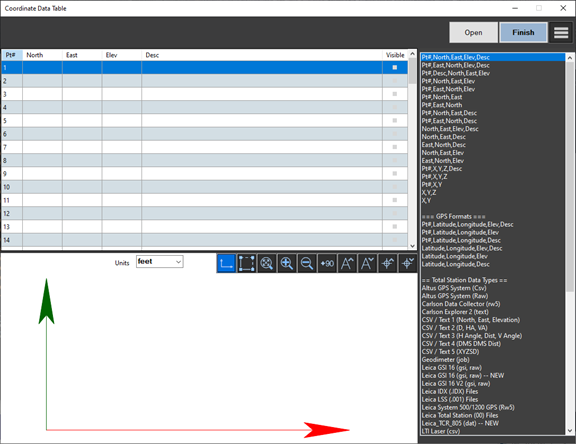
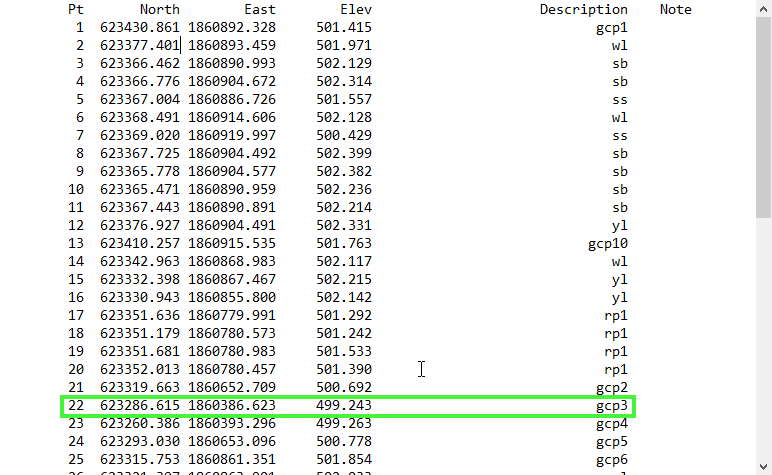
3. From the column on the right, select the appropriate format for the GCP file.
The proper format for the following example is Pt#,North,East,Elev,Desc.

4. Click Open, and then browse to, and open the GCP configuration text file.
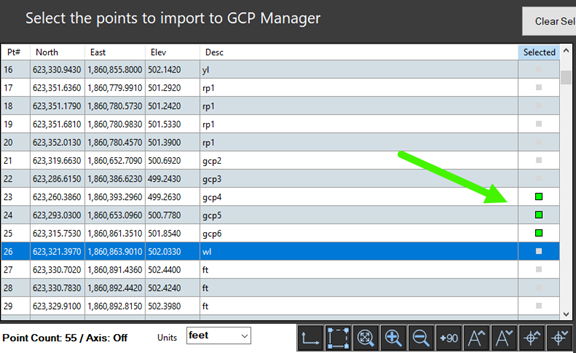
5. Check the boxes for the GCPs that you want to include.
6. Click Finish. The GCP Manager is populated with the GCP points from the text file.
7. Click OK.
8. Select the images that contain the GCP markers and select the GCP entries.
