Add, Edit or Delete Sheets in Existing Projects
|
1238888 |
You find this functionality in the view settings and filter toolbar on the right side. You need at least the Project Editor role to add, edit or delete sheets.
Sheet is a general term used in Sphere XG, HoloBuilder and the JobWalk App describing a layout, a floor plan, a 2D schematics, and so on. In other words, a sheet is a 2D image or document that can be used to get an overview of a capture, for example a building. It is created by users, software or a CAD system. A sheet may include text, a legend and scale information.
Note that these sheets are only visible in Sphere XG. They will not be visible in the JobWalk App or the HoloBuilder WebEditor. If you want sheets to be visible in the JobWalk App or in the HoloBuilder WebEditor, you can add them as areas in Sphere XG. For more information, see Import an Area into your Project.
Click the ![]() icon in this toolbar to open the Sheets form.
icon in this toolbar to open the Sheets form.
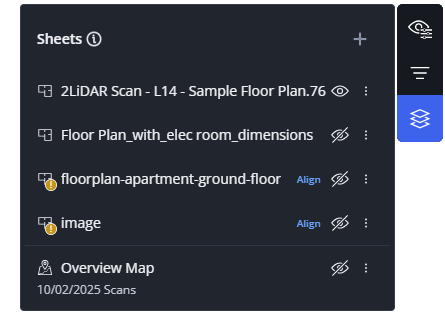
Figure 1-102 Sheets form
Add a Sheet
This option adds a sheet to the current area.
-
Click the + icon.
The Import sheet page is opened. -
Select the document you want to import from the file system and confirm or drag the document onto the page.
-
Click the Import button.
After you have added the sheet, the Alignment page is opened. On this page, you can align the new sheet to an existing sheet or to control points. See Align a Sheet to another Sheet for more information.
If you do not align the sheet at this point, the sheet will be shown with an exclamation mark in the Sheets form, see figure above.
You can also add areas to your project. See Import an Area into your Project for more information.
Edit a Sheet
You can change the name of a sheet.
-
Click the three-dots menu icon behind the sheet you want to edit and select Edit.
-
In the Edit form, change the name.
-
Click Edit.
Delete a Sheet
-
Click the three-dots menu icon behind the sheet you want to delete and select Delete.
-
Click Delete in the Delete Element? form to confirm.
Note that you cannot undo the deletion.
At least one sheet must remain in the project, i.e. it is not possible to delete the last sheet.
Align a Sheet
See Align a Sheet to another Sheet and Align an Area or a Sheet to Control Points.
