Interactive Registration Toolbar
|
1238888 |
The tools in the toolbar help you to visualize objects in the project.

Figure 9-6 Interactive registration toolbar
Connection Tools
For further information about connections, refer to Inspect Connection.
 Color connections by pairwise error
-
Cloud-to-Cloud connection: Shows the connections of a scan by pairwise (or local) error. The pairwise error is the error of the registration of a pair of scans. All other scans are not taken into consideration for the error calculation.
-
Targets connections: Shows the fit quality of the target for spheres, planes, markers and checkerboards in each scan. Errors after registration are not taken into consideration.
To check the pairwise error:
With a target connection or a cloud-to-cloud connection selected, click icon
You can open the connection properties and check the calculated error values by right-clicking the connection in the registration view or the structure view and selecting Properties from the context menu. For cloud-to-cloud connections, you can also open the properties by double-clicking them in the structure view.
 Color connections by global error
Shows the connections of a scan by global error. The global error is the error after the bundle adjustment. This means that all other scans and connections are taken into account.
To check the global error:
With a target connection or a cloud-to-cloud connection selected, click icon .
You can open the connection properties and check the calculated error values by right-clicking the connection in the registration view or the structure view and selecting Properties from the context menu. For cloud-to-cloud connections, you can also open the properties by double-clicking them in the structure view.
 Reference points connections
Shows or hides connections to reference points. See also Import Reference Points.
 Target connections
Shows or hides the connections between scans and targets. For further explanations on connections, see Connections.
 Cloud-to-Cloud connections
Shows or hides the cloud-to-cloud connections.
 All direct connections
Shows direct connections of a scan to other scans, targets, or reference points.
-
Select the scan for which you want to display all connections.
-
Click icon
.
If you want to see also connections to another scan:
-
Click the next scan.
-
Click icon
again. -
Repeat for more scans if required.
 Reset shown scan connections
Click icon to reset all connections that you have displayed with icon All direct connections .
If a scan is still selected, the connections will still be shown after you have clicked . To deselect the scan, click anywhere in the registration view.
Cluster and Scan Tools
 Color points by cluster
Colors scan points by cluster.
 Color points by scan
Colors scan points by scan.
 Default points color
Uses the default scan point color.
 Smart Clipping Box
Creates a smart clipping box around the scan positions to make them visible and hides the exterior.
|
Figure 9-7 Before creating clipping box |
Figure 9-8 After creating clipping box |
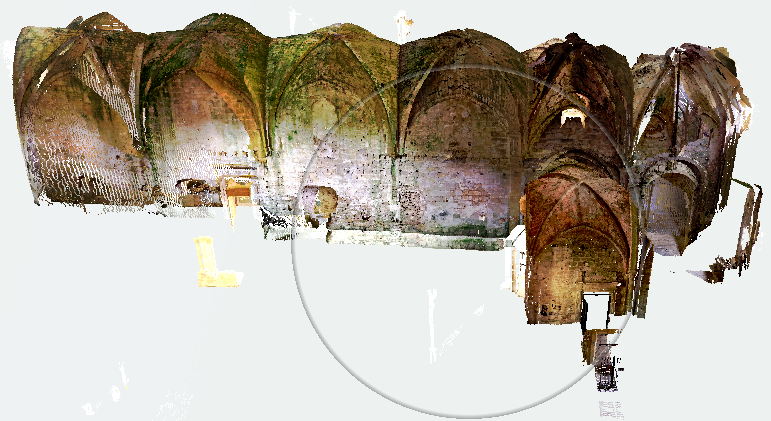
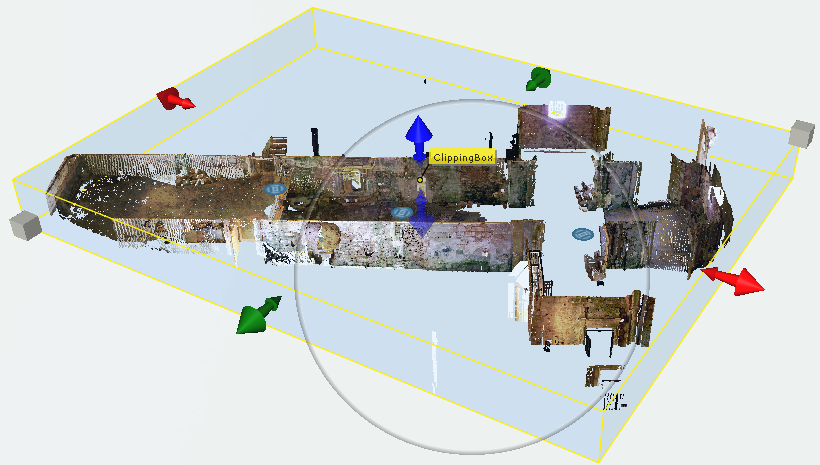
You can now manipulate the clipping box by grabbing and dragging the handles. The clipping box is stored and is available in the structure view either on project level or in the cluster in which it was created.
If you resize the clipping box to a subset of the project and you are hiding the interior or exterior, you can toggle between clipping only points and clipping everything by clicking button  .
.
This is especially useful when you want to register a project with multiple floors.
You must click icon  in the clipping (or use the context menu) to make the clipping box invisible. Otherwise, you can't select objects in the registration view.
For further information on clipping boxes, refer to section Clipping Boxes (3D View).
 Identify scan
Allows you to identify to which scan a scan point belongs.
-
Click any scan point or scan point group in the registration view.
-
Click
.
The scan to which the selected scan points belong is highlighted in the structure view and in the registration view.

