Make Measurements in a Project
|
1238888 |
Measurements allow you to rapidly verify distances, lengths and areas in the 2D view, 3D view and walk mode view.
The procedure described below works for 360° photos with depth information. If you want to make measurements in 360° photos without depth information, see Make Reliable Measurements in your 360° Photos.
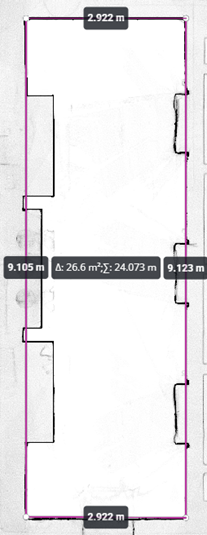
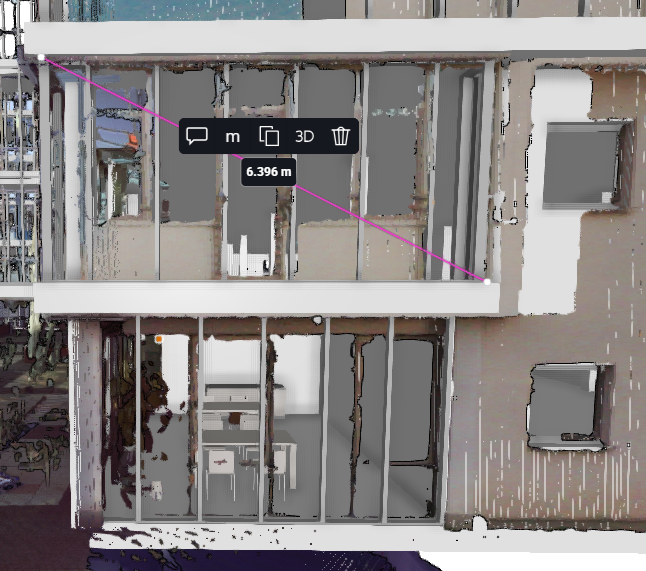
The figures below show a measurement in the 2D view and a measurement in the 3D view.
|
|
|
|
Figure 1-151 Measurement in the 2D view |
Figure 1-152 Measurement in the 3D view |

In the Sphere XG Viewer, measurements are displayed with the ![]() icon.
icon.
You can configure the visibility of objects in the current view in the General View Settings.
Create Measurements
-
Go to the view in which you want to create a measurement.
Note that measurements in the walk mode view are only possible if the 360° photo contains depth information. -
Click icon
 in the toolbar on the right side.
 -
Click the point in the view where you want to start the measurement.
-
Drag the mouse to the next measurement point and click.
-
Repeat the above step if you need more than one measurement point.
-
To finish the measurement, double-click the end measurement point or press the ESC key.
To finish a perimeter measurement, click the first measurement point.
If you measure a perimeter in the 2D view, the complete perimeter as well as square feet/meters are calculated automatically, see figure above.
To cancel a measurement, click ![]() the icon in the toolbar again.
the icon in the toolbar again.
To undo the last segment(s) in a measurement, press the Backspace key. Then the solid line changes back to a dotted line and you can place the measurement again.
You can change the unit for the measurement in the user settings, see User Account: Language and Units.
Visibility of Measurements
Once a measurement is captured, it is also visible to other users navigating the project. Most of the measurements will be available across other views. Their visibility will depend on the type of view activated and of the current position of the camera. Moving far away from a measurement will first collapse its detail information and then fade it once the camera is too far away.
You can configure the visibility of objects in the current view in the General View Settings.
Convert a Measurement into an Annotation
Converting a measurement into an annotation allows you to track additional information, adding descriptions, file attachments or assigning activities to colleagues.
-
Click the measurement icon in the view.
-
In the toolbar, click icon
 .
. -
Follow the instructions under Create an Annotation.
Copy to Clipboard and Share Measurement
-
Click the measurement icon in the view.
-
In the toolbar, click icon
 .
. -
From the dropdown select the option you want, see below.
The measurement data is copied to the clipboard.
-
Paste the measurement data into an email or another communication tool.
Copy and Paste Options
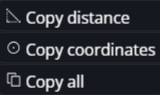
Copy distance: Copies the distance values.
Copy coordinates: Copies the list of coordinates. You can then paste these coordinates in Autodesk commands.
Copy all: Copies all measurement data (default).
Select a Different View of a Measurement
You can select different views of a measurement in the measurement toolbar. Note that these views are only available for two-point measurements.
By default, the 3D distance view is active and the ![]() icon is displayed in the measurement toolbar. This measurement view shows the distance between points. If you measure a perimeter, the square feet/meters are calculated automatically, see figure at the top of the page.
icon is displayed in the measurement toolbar. This measurement view shows the distance between points. If you measure a perimeter, the square feet/meters are calculated automatically, see figure at the top of the page.
Display Vertical and Horizontal Distances
Select the ![]() icon in the measurement toolbar.
icon in the measurement toolbar.
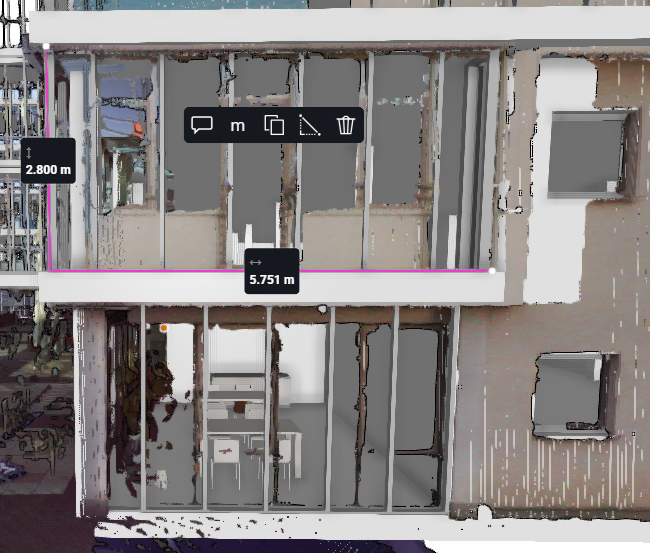
The measurement changes from a diagonal measurement to a vertical and horizontal measurement, see figures below.
|
|
|
|
Figure 1-153 Diagonal measurement |
Figure 1-154 Presented as vertical and horizontal measurement |
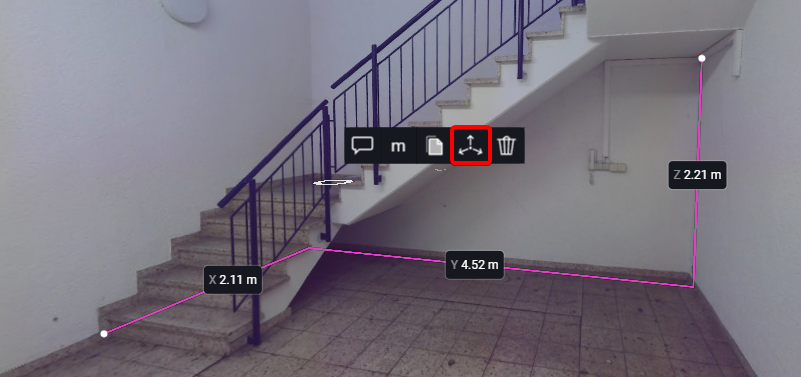
Display Distances along the X, Y and Z Axes
Select the ![]() icon in the measurement toolbar.
icon in the measurement toolbar.
The measurement displays the axes, see figures below.
|
|
|
Figure 1-155 Measurement with displayed axes |
Snap Measurement to Edges or Corners
-
Start the measurement as usual.
-
Now, while moving the measurement to the point you want to place the next measurement point, press the CTRL key.
You can keep the CTRL key pressed while measuring or you can just press it if you want to snap the measurement to a specific edge or corner. You can also alternate between pressing the CTRL and the SHIFT key.
When the mouse pointer is nearing an edge or corner, it will automatically snap to this point.
Snap Measurements to Horizontal or Vertical Lines
-
Start the measurement as usual.
-
Now, while moving the measurement along a horizontal or vertical distance, press the SHIFT key.
You can keep the SHIFT key pressed while measuring. You can also alter pressing the SHIFT and the CTRL key.
You do not need to worry if you are actually following the straight line because the measurement will automatically snap to the horizontal or vertical line.
Delete a Measurement
-
Click the measurement icon in the view.
-
In the toolbar, click icon
 .
. -
Confirm the deletion.
Note that you cannot undo a deletion once it is confirmed.
