Capture Tab: 2D View
|
1238888 |
The 2D View is the standard view that will be shown on opening a project from the Sphere XG Dashboard. This view is a planar, floor plan visualization mode. If you are currently in another view, click icon ![]() in the toolbar on the lower left side to open the 2D view. The 2D view is available in the live and draft view. This is also the view in which you can register your scans in the draft view, see Edit Project Registration in the Draft View.
in the toolbar on the lower left side to open the 2D view. The 2D view is available in the live and draft view. This is also the view in which you can register your scans in the draft view, see Edit Project Registration in the Draft View.
The 2D view shows one or more sheets of your project. There can be several sheets which you can then overlay. If you have uploaded a scan project with an overview map, for example via SCENE or Blink scans via the Stream app, the 2D view shows the overview map.
You can add further sheets in the same area, see Import a Sheet into your Project.
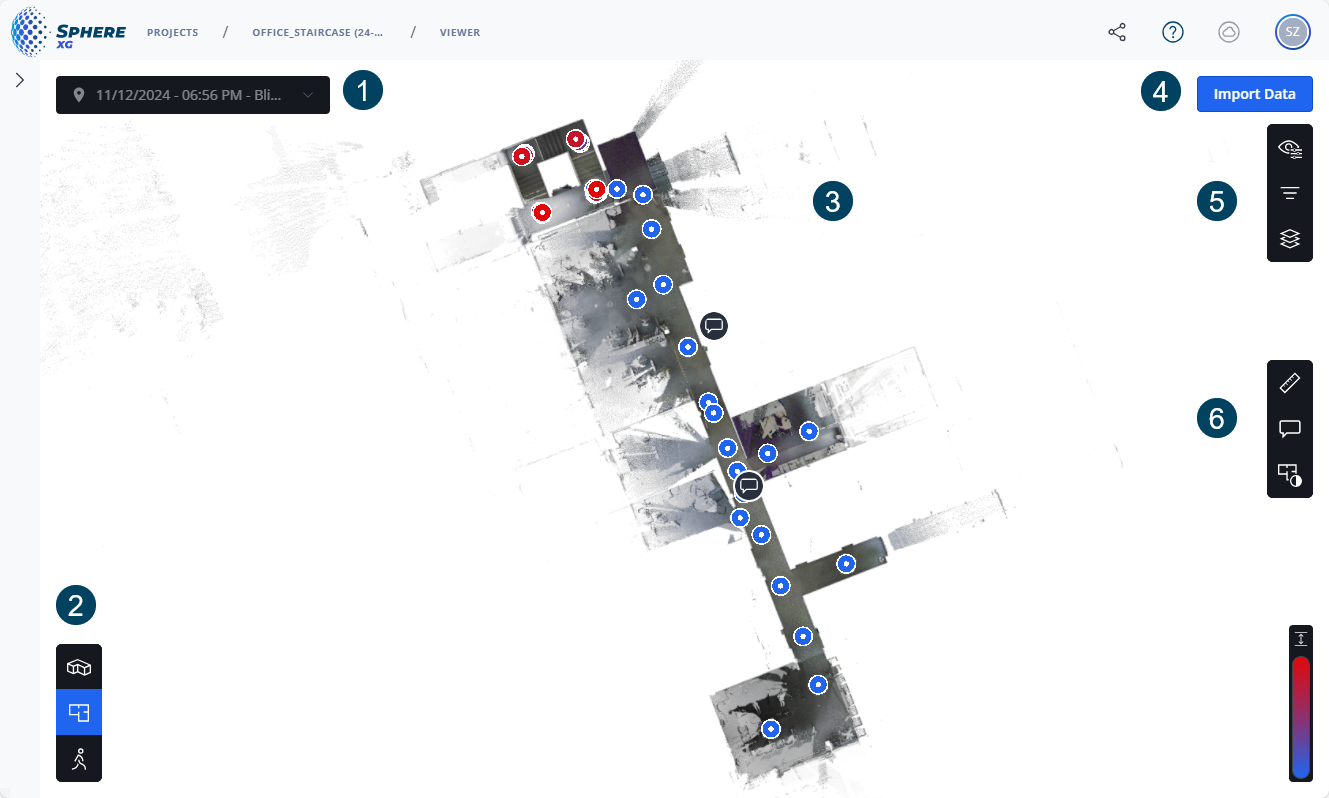
Figure 1-42 2D view
 Breadcrumbs and toggle Live/Draft
-
The breadcrumbs show you where you are in the project. Clicking a breadcrumb opens the corresponding page.
-
With the Live/Draft toggle, you can change between the draft view page and the published (live) project. You can also open the Draft view by clicking the Edit scans button, see below. If you are looking at a project that is currently being published, the toggle is marked with a red indicator dot.
 Dropdown list: If there are more than one structured .e57, .geoslam files, data sets (imported files from Stream, SCENE or from the project draft view) or trajectories in the project, you can select these elements from the dropdown list.

 2D view of the project: If a project has been uploaded, an overview plan is created automatically.
The icons in the 2D view may contain:
![]() Flash scans
Flash scans
![]() Trajectory points for GeoSLAM static scans and VideoMode waypoints from HoloBuilder.
Trajectory points for GeoSLAM static scans and VideoMode waypoints from HoloBuilder.
![]() Generic waypoints for different types of data, i.e. a 360° photo, a scan or a static image. If you hover the mouse pointer over a waypoint and an image is attached, the image name and the capture date are displayed.
Generic waypoints for different types of data, i.e. a 360° photo, a scan or a static image. If you hover the mouse pointer over a waypoint and an image is attached, the image name and the capture date are displayed.
![]() Waypoint created in the HoloBuilder WebEditor with a 2D photo (without position information). Starting from Sphere XG later than July 2025, you can attach 2D photos to waypoints directly in Sphere XG. For more information, see Waypoints in Sphere XG and subchapters.
Waypoint created in the HoloBuilder WebEditor with a 2D photo (without position information). Starting from Sphere XG later than July 2025, you can attach 2D photos to waypoints directly in Sphere XG. For more information, see Waypoints in Sphere XG and subchapters.
![]() 2D photos created in HoloBuilder.
2D photos created in HoloBuilder.
![]() Location marker. These location markers are placeholders for images that should be added, see Create new Waypoints.
Location marker. These location markers are placeholders for images that should be added, see Create new Waypoints.
![]() Measurement. If you zoom in, the measurement details are displayed, see also Make Measurements in a Project.
Measurement. If you zoom in, the measurement details are displayed, see also Make Measurements in a Project.
![]() Annotation. If you zoom in, the annotation details are displayed, see also Create and Manage Annotations.
Annotation. If you zoom in, the annotation details are displayed, see also Create and Manage Annotations.
![]() Measurement with an annotation.
Measurement with an annotation.
If you click a waypoint, a Flash scan or a 360° photo, the view changes to the walk mode view assuming the perspective from the selected point.
You can move waypoints, 360° photos, 2D photos and location markers, see Move Waypoints within an Area for more information.


